How to Make Strong Cordage in the Field: Natural Fibers, Braids, and Strength-Testing for Real Loads
Why Strong Cordage Matters When the Load Is Real
Cordage is a tool, not a craft project
If you’ve spent time in the field, you already know cordage is never “just” cordage. It’s a structural component that turns sticks into a shelter, a tarp into a weatherproof system, and loose gear into a secure load. When you’re wet, cold, and tired, you don’t get extra points for improvisation if the line snaps at 0200.
Related Articles:
In military training, we treated anything load-bearing as mission-critical. A knot, a strap, a buckle, a line-every part gets assessed by function, not appearance. Field-made cordage should be approached the same way.
Your goal isn’t pretty fibers; it’s predictable performance. Natural cordage also changes how you think about resources. You stop seeing “weeds” and start seeing tensile strength, friction, and fiber length.
The real-world tasks that expose weak cordage
Some tasks barely test cordage: tying a bandana, hanging a light item, bundling kindling. Others expose every weakness fast. Ridgelines under wind load, guy lines under shock, and lashings supporting body weight will punish uneven twist and poor fiber prep.
Here are realistic loads that separate “string” from dependable cordage:
- Shelter ridgeline supporting a tarp plus wind gusts
- Tripod lashings suspending a pot (constant heat and vibration)
- Load securement on a pack frame or sled drag
- Improvised litter or assist line (high consequences)
If you plan to bet warmth, calories, or safety on cordage, you must build and test it accordingly.
Quick field rule: If failure would cause injury, exposure, or loss of essential gear, treat the cordage like a load-bearing component and proof-test it.
Knowing Your Fibers: What Holds and What Fails
Long fibers, clean fibers, consistent fibers
Strong cordage starts at the fiber level. The best natural fibers are long (fewer ends to slip), tough (high tensile strength), and somewhat flexible (resists snapping under shock). Short, brittle, or overly woody fibers create weak spots and unpredictable break points.
Consistency matters as much as strength. If your strand thickness varies every few inches, tension concentrates on the thin sections. That’s how you get a rope that “mostly” holds-until it doesn’t.
As a rule, prioritize fiber sources you can process into long ribbons or long hair-like bundles. When you’re forced to use short fibers, compensate by increasing diameter and using more plies.
High-value natural fiber sources (by region)
You can make cordage from a lot of plants, but a few are consistently reliable. If you’re new to this skill, start with one or two species you can identify with confidence.
High-value options include:
- Nettle (stems): strong bast fibers when retted and scraped
- Dogbane / Indian hemp: excellent cordage fiber with minimal stretch
- Milkweed: usable fiber, often shorter than dogbane but workable
- Yucca / agave: stiff but very strong leaf fibers when pounded and combed
- Inner bark (basswood, cedar, willow): good for longer lengths after retting
- Grasses and sedges: quick cordage, lower strength, best for light lashings
If you’re unsure what’s local, use the USDA PLANTS Database to identify likely fiber plants in your area before you ever head out. Knowing your options ahead of time is part of preparation.
Operational mindset: Don’t improvise plant ID under stress. Learn two or three reliable fiber sources in your local environment and practice with them.
Harvesting and Processing Fibers Without Ruining Them
Harvest timing and selection in the field
The best plant fibers often come from mature stalks that have started to dry but aren’t fully rotted. Green stalks can work, but they usually require more processing. They can also shrink as they dry, loosening knots and lashings.
Look for stems that are straight, tall, and relatively uniform. Avoid stalks that are heavily insect-damaged or sun-rotted. If you can bend the stalk and it fails like dry spaghetti, expect brittle fibers.
For inner bark, choose downed material where possible. Avoid ring-barking live trees unless it’s a true emergency. Even then, take small amounts from multiple sources rather than killing one tree.
Retting, pounding, scraping, and drying (the efficient way)
“Retting” is controlled rotting that separates usable fibers from pith and woody material. In the field, you can rett stems by soaking them in water for hours to days depending on temperature. Warmer water speeds it up; cold water slows it down.
For yucca and similar leaves, soaking helps, but mechanical processing does most of the work. Pound the leaf with a smooth rock or baton, then scrape away green tissue and comb out fibers. Repeat until the fibers look clean and stringy.
Drying matters for strength and handling. Slightly damp fibers twist and bind well, but soaking-wet fibers can hide defects and stretch under load. Aim for “leather damp”: flexible, not dripping.
Checklist: fiber prep that prevents weak cordage – Remove pith/woody chunks completely – Separate fibers into uniform bundles – Keep fiber direction aligned (no random tangles) – Work slightly damp for better twist, then dry under light tension
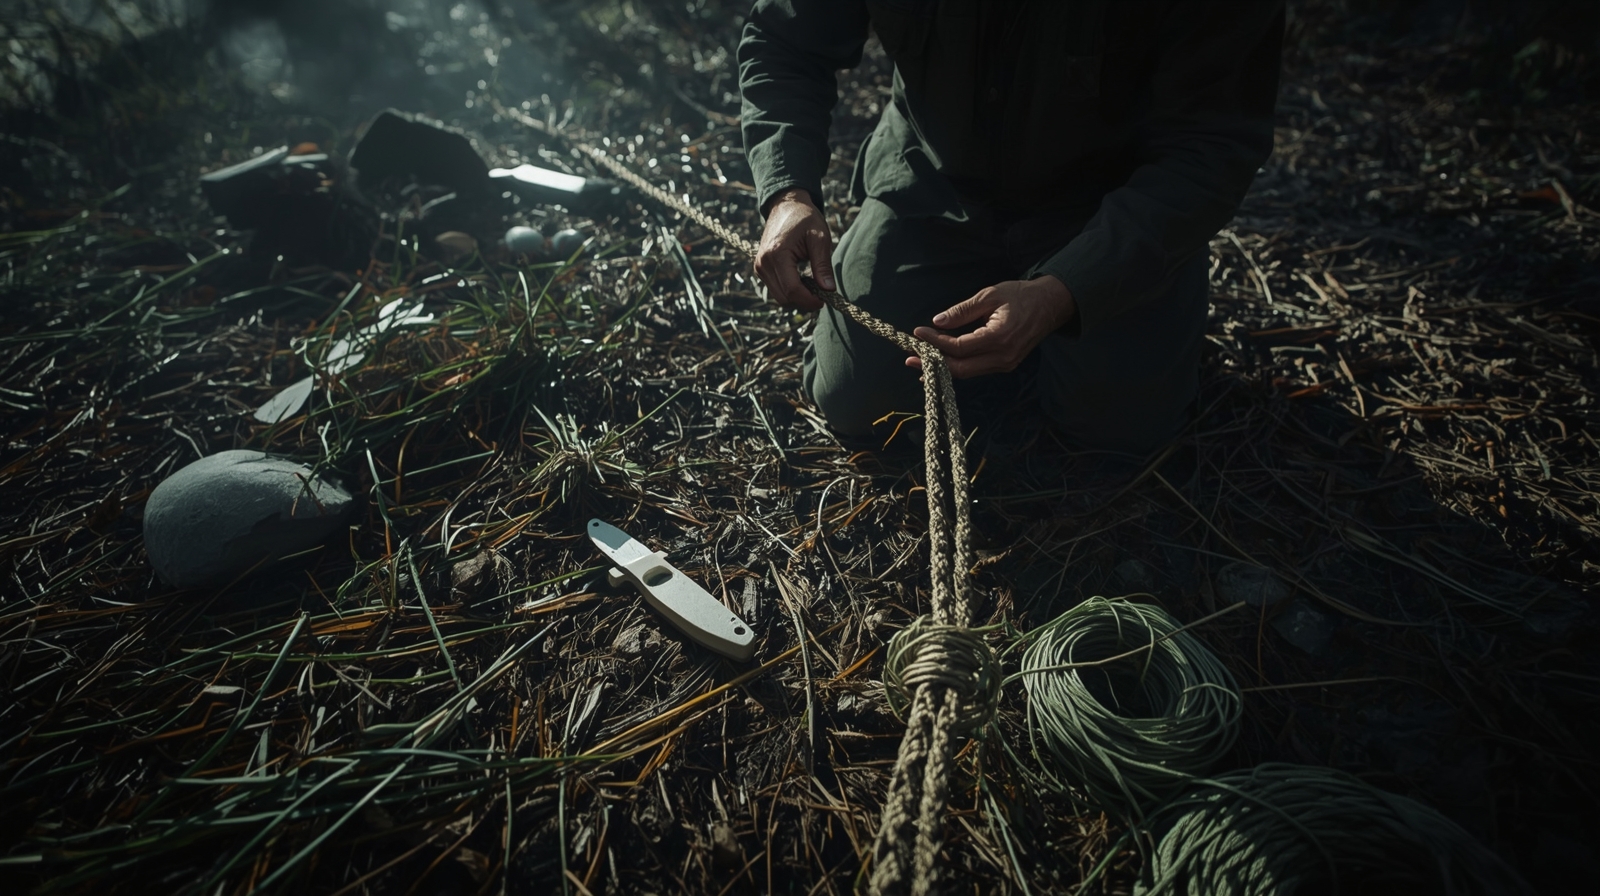
Core Construction Methods: Twist, Reverse-Wrap, and Basic Rope Layout
The two-ply reverse-wrap (field standard)
If you learn one method that works almost everywhere, make it the two-ply reverse-wrap. It’s fast, strong for its diameter, and resists untwisting because each ply is twisted one way while the pair is wrapped the other way.
Use this step-by-step sequence:
- Split your fibers into two equal bundles.
- Twist the right bundle away from you until it wants to kink.
- Bring it over the left bundle (toward you) to lock it.
- Repeat: twist the new right bundle away, then wrap it over.
Work in short cycles. If you twist too much before wrapping, you’ll create kinks that turn into lumps and weak spots.
This technique is forgiving with mixed fibers and still holds up when wet. It’s also easy to repair by back-twisting and splicing in fresh fiber.
Controlling diameter, tension, and consistency
Consistency is what makes natural cordage trustworthy. Keep your twist rate steady and feed fibers into the strand before it thins out. If one ply gets smaller than the other, the larger ply carries less load and the smaller one becomes the failure point.
A good habit is to “dress” the cordage every few inches. Run your fingers along it, feel for bumps, and redistribute fibers while you still can. Once it’s fully tightened and dry, fixing uneven sections is harder.
If you need more strength, don’t just twist tighter. Increase diameter by adding fibers evenly to both plies, or build multiple finished cords and lay them together into a larger rope.
Transitioning from basic twist to higher-load construction is the natural next step, especially if you’re building ridgelines or hauling lines.
Braids and Multi-Ply Rope for Higher Loads
When a braid beats a twist
Twisted two-ply cordage is excellent for general use, but braids have advantages when you need a flatter profile, reduced rolling, or better abrasion resistance. A three-strand braid can also be easier to keep uniform if your fibers are already in tidy bundles.
Braids are especially useful for:
- Pack straps and bindings where flat is better than round
- Lashings where you want extra friction against poles
- Sling-style carry lines for bundles
The tradeoff is time and fiber consumption. Braids often require more total material for the same tensile strength as a well-made multi-ply rope. The upside is stability and handling.
Building three-ply rope from finished cords
For real loads, one of the most reliable field methods is to make three identical two-ply cords, then lay them into a rope. This mirrors how many commercial ropes are constructed-just without machinery.
Process:
- Make three equal-length cords with consistent diameter.
- Anchor one end (loop it around a stick or tree).
- Twist each cord in the same direction until lively.
- Lay the three cords together in the opposite direction.
The key is balanced tension. If one cord is looser, it won’t share load evenly. When done right, a three-ply rope handles shock better and resists abrasion more than a single two-ply cord.
Field tip: If you’re building a line for a ridgeline or hauling, a three-ply lay-up is usually worth the extra time.
Joining Lengths Without Creating a Weak Link
Splices that survive tension
Knots in natural cordage can be a failure point because they create sharp bends and crush fibers. Splices are usually stronger because they preserve fiber alignment and spread load over a longer area.
A practical field splice for reverse-wrap cordage is the overlap splice:
- Untwist the last 2-3 inches of each cord end.
- Overlap the fiber bundles so each ply merges with its matching ply.
- Twist and reverse-wrap as normal, capturing the new fibers gradually.
The longer the overlap, the stronger the splice. For higher loads, overlap 6-10 inches and taper the added fibers so you don’t create a big lump.
Knots that behave better with natural fibers
Sometimes you must tie knots. Natural cordage varies in friction and stretch, and some fibers get slick when wet. Use knots that set securely and don’t rely on high elasticity.
Good options include:
- Bowline for a fixed loop (back it up if the cord is stiff)
- Taut-line hitch for adjustable tension (works better on rougher fibers)
- Timber hitch for hauling/dragging (tightens under load)
Avoid knots that cinch too tightly on fragile fibers, because they can cut themselves under load. Also avoid tiny knots on thick, stiff cordage; you’ll end up with poor dressing and uneven loading.
Quick rule: If you must knot natural cordage for a load, increase cord diameter and add a backup knot. You’re buying safety with material.
Strength Factors: Diameter, Fiber Type, Moisture, and Wear
What actually determines cordage strength
Cordage strength isn’t magic. It’s a combination of fiber tensile strength, fiber length, twist quality, and cross-sectional area. In plain terms: better fibers plus more material plus good construction equals higher capacity.
Moisture changes the game. Some plant fibers swell when wet, increasing friction inside the rope (good). But they can also stretch (bad) and weaken at abrasion points.
Wear is the silent killer. Cordage that’s run over bark, rock edges, or gritty poles loses strength fast, especially if the fibers are coarse. Plan for chafe protection if you’re going to tension the line hard.
Estimating strength in the field (without numbers you can’t verify)
You won’t have a lab in the bush, so think in categories: light, medium, heavy. Then apply a safety factor based on consequence.
Use this practical framework:
- Light duty: bundling, tying gear, small traps where legal
- Medium duty: tarp guy lines, cooking tripod lashings
- Heavy duty: ridgelines in wind, hauling, body-support tasks
For heavy duty, either build multi-ply rope or double/triple your line. Redundancy is a field habit for a reason.
If you want deeper technical background on load safety concepts, OSHA’s guidance on lifting and rigging is a solid reference point even if you’re not on a jobsite: OSHA safety and health topics.
With strength factors understood, you’re ready to test cordage like you actually plan to use it.
Proof-Testing and Strength-Testing for Real Loads
Proof testing: how to load it without gambling
In training, we didn’t “trust” a system because it looked good. We tested it. Proof testing is applying a controlled load below expected failure to catch defects before the line is mission-critical.
A safe field method:
- Anchor the cordage to a solid object (tree base, boulder).
- Add load gradually using body weight, a pack, or water-filled containers.
- Hold the load for 30-60 seconds.
- Inspect for strand separation, popping fibers, or splice creep.
Do this with your face and body out of the failure path. If it snaps, it can whip. Stand to the side, not in line.
Simple test rigs you can build with what you have
You can build a basic test using a stick as a toggle and a pack as the load. Tie a fixed loop to the toggle, run the line to an anchor, and hang the pack. Add weight incrementally: water bottles, rocks wrapped in a jacket, or a filled dry bag.
For lashings, test the whole system. A cord might hold 60 pounds in straight pull, then fail at 25 pounds when bent hard around a pole and rubbed under vibration. That’s not just a cord problem; it’s a system problem.
If your cordage is meant for a ridgeline, tension it like a ridgeline and let it sit. Wind and time reveal poor splices and uneven twist.
Quick reference box: failure signs you don’t ignore – Fibers “hissing” or popping under load – Splice bulge sliding or thinning – Rapid fuzzing at contact points – Uneven stretch (one ply elongates more)
Field Applications That Demand Strong Cordage
Shelter rigging that stays tight overnight
A reliable shelter system depends on predictable tension. Natural cordage can creep as fibers settle, especially if the line was twisted wet and then loaded. Counter that by pre-stretching and re-tensioning once before you commit for the night.
For ridgelines, use thicker multi-ply rope and protect it where it contacts bark. A small strip of cloth, a flat piece of bark, or even a smooth stick can act as a chafe guard. If you’re running a taut-line hitch on a slick fiber, add an extra wrap.
For guy lines, you can often get away with smaller diameter cordage. Build it with consistency anyway. A thin spot on a guy line will fail right when a gust hits, and you’ll be back outside fixing it.
Lashing poles, tripods, and load-bearing frames
Lashings introduce abrasion, bending, and heat (near fires). Use cordage with extra diameter, and consider a flatter braid if the poles are smooth. A rope that’s strong in a straight pull can still fail if it’s crushed in a knot and rubbed against a pole all evening.
When lashing, wrap tight and keep turns neat. Crossing wraps randomly creates uneven pressure points. Finish with frapping turns (tightening wraps between poles) to lock everything down.
For load frames or drags, assume movement and grit. Double the cordage at wear points and plan for periodic retightening. Field systems loosen over time; that’s normal, but you need to monitor it.
Mistakes to Avoid and Practical Upgrades That Add Strength Fast
Common failures I see when people rush the process
Most cordage failures trace back to speed and sloppiness, not bad materials. You can have great fibers and still build a weak line if your twist is inconsistent or your splice is too short.
Here are the most common issues to watch for:
- Uneven strand thickness that creates predictable break points
- Over-twisting that forms hard kinks and lumps
- Short overlaps in splices that creep under steady tension
- No chafe management at contact points (bark, rock, pole crossings)
- Skipping proof tests and finding problems when the weather turns
If you need a fast strength upgrade, go thicker and go redundant. Build a three-ply rope, double your ridgeline, or run two independent guy lines instead of one. In the field, simple solutions that you can inspect quickly tend to be the ones you trust.