Rope Systems and Mechanical Advantage in the Field: Anchors, Z-Drag Hauls, and Raising/Lowering Loads Safely
Mechanical Advantage Starts With a Real Problem: Moving Loads Without Breaking People or Gear
Why mechanical advantage matters more than muscle
If you’ve ever tried to drag a stuck vehicle, haul a heavy pack up a bank, or raise a litter over a ledge, you already know the problem: the terrain always wins if you rely on strength alone.
Related Articles:
Mechanical advantage (MA) is how you turn limited human power into controlled movement. You trade rope travel for pulling force, and you gain the ability to pause, reset, and continue without losing ground.
In military training environments, we hammered one lesson into teams early: you don’t get credit for almost controlled. When loads move, they store energy.
If something fails-an anchor, a knot, a connector-that energy gets paid back fast. The point of MA isn’t just to make things easier; it’s to make things predictable.
Your baseline goal should be this: build a system you can stop at any time, hold without drama, and reset without improvising under tension. That’s the difference between a clean haul and a bad incident report.
Define the mission before you touch the rope
Before building anything, lock in what problem you’re solving. Are you hauling a person, raising a pack, moving a log, or repositioning a vehicle a few feet?
Each mission changes your tolerances, your redundancy, and your acceptable risk. Human loads, especially, demand conservative choices and clean procedures.
Start by answering three questions:
- How far does the load need to move (and in what direction)?
- What happens if the load drops one foot?
- What’s your strongest available anchor option?
If the consequence of a slip is serious injury, you don’t “make do.” You build a system with progress capture (a one-way ratchet), edge protection, and clear commands.
That’s not overkill. That’s professional discipline.
The simplest mechanical advantage you should trust
A straight pull (1:1) is the simplest system, and it’s often the safest if the load is manageable.
Add a change of direction (a pulley or carabiner redirect) and you can keep the haul team out of the fall line or away from the edge. This doesn’t increase MA, but it improves control and reduces hazards.
The Z-drag (3:1) is the workhorse because it’s buildable with minimal gear and provides meaningful force multiplication. But don’t get hypnotized by the math.
On paper, 3:1 sounds like you get triple the power. In the real world, friction and sloppy layout can cut that advantage in half.
Quick reference: If your system cannot safely stop the load at any moment, you do not have a system-you have a gamble.
Rope, Hardware, and Friction: The Hidden Tax That Kills Your Numbers
Now that you’ve framed the problem, it’s time to get honest about equipment. The wrong rope or high-friction hardware can make a “3:1” feel like a dead lift.
Rope choice, stretch, and why diameter still matters
Dynamic climbing rope is designed to stretch and absorb falls. That stretch is a feature for lead climbing, but it’s usually a drawback for hauling and raising.
Why? Because it wastes input energy and makes the system feel spongy. For field hauling, low-stretch (static or semi-static) rope is typically preferred because your pulling translates into movement.
Diameter matters in two ways: handling and efficiency. Thinner rope runs with less friction through hardware, but it can be harder to grip and may not play well with certain friction hitches.
Thicker rope is easier on hands and often more durable around edges, but it can increase friction and reduce MA.
If you’re building systems with friction hitches (prusiks, Klemheist, etc.), you need hitch cord sized appropriately for the main line. Mismatched diameters are a common cause of slipping or glazing.
Hardware selection: pulleys, carabiners, and progress capture
A real pulley with bearings is not a luxury if you care about actual mechanical advantage. A carabiner used as a pulley substitute works in a pinch, but it adds significant friction-especially under heavier loads.
If you’re trying to move something that already barely budges, that friction can be the difference between success and exhaustion.
Progress capture devices (PCDs) are what make a haul system operationally safe. They prevent backsliding when the team resets.
In the field, friction hitches can serve as progress capture, but they must be correctly tied, dressed, and monitored.
For general guidance on rigging safety principles and equipment use, OSHA’s rigging resources are worth reviewing even if you’re not on an industrial site: OSHA rigging and slings eTool.
Real-world friction: what your MA probably is
Here’s the honest version: theoretical MA is a planning number, not a performance guarantee. Every bend, contact point, and rope-on-rope interface steals force.
A 3:1 built with carabiners and poor alignment might behave like a 1.5:1.
Use this mindset instead: MA is a way to reduce peak effort and improve control, not a promise of triple power.
You can improve effective MA by:
- Using pulleys instead of carabiners where possible
- Keeping rope paths straight and clean
- Protecting edges so the rope isn’t grinding
- Avoiding unnecessary redirects
The best indicator is the load itself. If the load surges, stalls, or chatters, friction and alignment are working against you.
Anchor Systems That Don’t Lie: Choosing and Building Bombproof Points
Once your rope and hardware are squared away, your next problem is simple: what holds all of this together. Anchors are where good systems start-and where bad ones fail.
Anchor selection in the field: natural, vehicle, and constructed
In the field you’ll usually choose between natural anchors (trees, boulders), vehicle anchors, and constructed anchors (pickets, deadman, rock horns).
Your priority is strength, then directionality, then redundancy.
A solid tree can be excellent, but only if it’s alive, well-rooted, and sized for the load. Wrap low, protect the bark if you can, and align the pull so you’re not side-loading the anchor.
Boulders can work, but beware of perched rocks that can roll once tension hits.
Vehicles are tempting anchors, but they add complexity: wheels can slip, suspension can shift, and attachment points may not be rated.
If you must anchor to a vehicle, use rated points and consider chocking or additional security.
Equalization and load sharing without false security
Equalization is supposed to distribute force across multiple points. Done wrong, it just spreads failure.
Two common problems are:
- Extension: a failure causes sudden shock-loading
- Unequal sharing: one anchor takes most of the load
A practical approach is to keep things simple and directional. If you have one excellent anchor, build from it.
If you need multiple points, use a method that limits extension and keeps angles narrow.
Here’s a quick comparison to keep your thinking straight:
| Approach | Strengths | Weaknesses | When to use |
|---|---|---|---|
| Single strong anchor | Simple, fewer failure points | Requires truly solid anchor | Most hauls/lowers when available |
| Two-point equalized | Redundancy | Can extend or mis-equalize | When no single point is trustworthy |
| Three-point anchor | Better load distribution | More complexity and friction | Heavier loads, variable direction |
Anchor angles and the quiet force multiplier
Angles are a hidden danger. As the angle between anchor legs increases, force on each leg increases fast.
Keep your anchor leg angles tight when possible, and keep the direction of pull consistent with the anchor’s strongest orientation.
If you remember one rule: wide angles are convenient but expensive. They cost you strength and can turn an adequate anchor into a failure point.
Quick reference: Build anchors to be strong, directional, and redundant-then keep the system layout clean so you don’t reintroduce risk downstream.
Knots and Hitches That Keep Systems Predictable Under Load
With anchors handled, your next friction point is usually human error. Knots and hitches are where small sloppiness becomes big consequences.
Working knots for anchors and load attachment
You don’t need a hundred knots. You need a small set you can tie correctly under stress, with gloves on, in bad light.
For anchor attachment and fixed loops, the figure eight family and bowline variants are common choices. The real key is consistency: tie the knot the same way every time, dress it cleanly, and leave adequate tails.
For load attachment, avoid knots that are hard to untie after heavy loading if you expect to reset frequently. A figure eight on a bight is reliable but can cinch tight.
A bowline can be easier to untie, but it needs proper finishing and inspection to prevent loosening.
If you’re teaching a team, standardize your knot list. When people improvise, inspection gets harder, and small errors survive long enough to become big ones.
Friction hitches as progress capture: benefits and limits
Friction hitches are the backbone of minimalist systems. A prusik hitch is common, but it’s not magic.
It can slip if it’s tied with the wrong cord size, if the cord is wet or icy, or if it’s not dressed properly.
Under heavy loads, it can also glaze the cord. That reduces grip and damages fibers.
A Klemheist or autoblock style hitch can work better in some conditions, especially when you need directional grip.
Whatever hitch you use, treat it like a component that requires monitoring. If the hitch is creeping, stop and fix it. Don’t “just pull harder.”
This is also where disciplined spacing matters. If your progress capture hitch is too close to a pulley or carabiner, it can jam or fail to bite properly.
Inspection habits that catch errors early
Rigging failures are often inspection failures first. Build in short pauses:
- After the anchor is built
- After the MA is assembled
- Before you commit to a high-tension pull
Have a second person check:
- Knot correctness and tails
- Carabiner gates locked and oriented
- Hitch orientation and spacing
- Rope path clear of sharp edges
In the field, I treat this like a pre-combat check. It’s not about distrust; it’s about catching what fatigue and urgency hide.
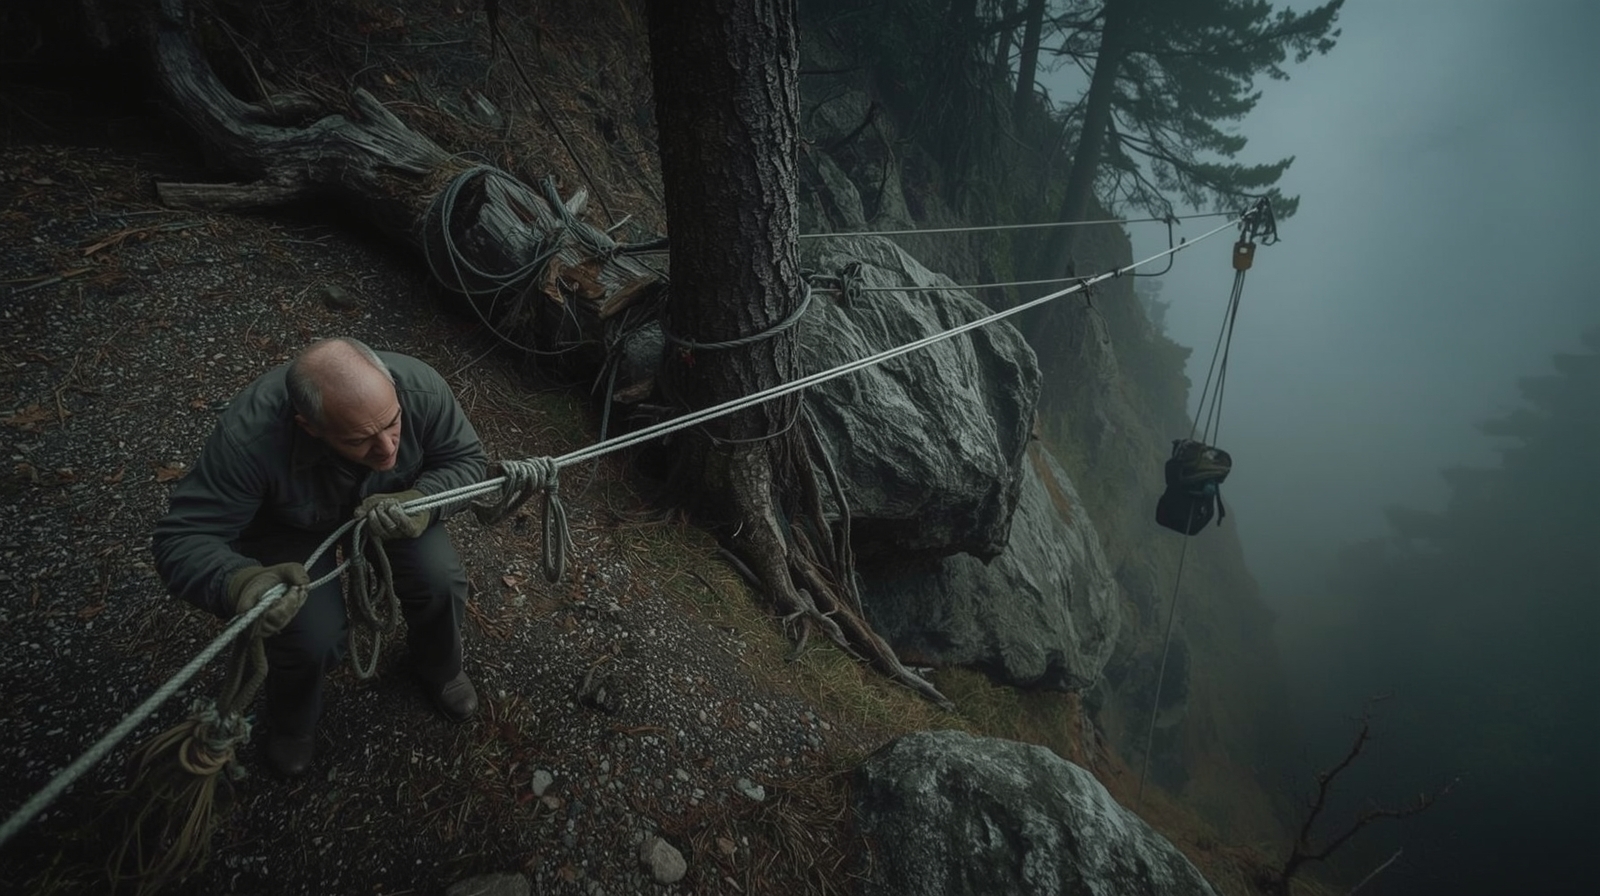
Z-Drag (3:1) Hauls for Real Terrain: Build, Run, Reset
At this point you have the fundamentals. Now you can put them together into a system you’ll actually use.
Building a basic Z-drag you can actually operate
The Z-drag is popular because it’s simple and effective with limited equipment.
Conceptually, you anchor the rope, run it to a traveling pulley attached to the load, then back to a fixed pulley (or redirect) near the anchor, and pull the tail.
To make it field-usable, add progress capture so you can reset without losing ground.
In minimalist setups, this is often a prusik hitch on the main line attached to the anchor. In more advanced kits, you might use a progress capture pulley.
A clean, repeatable build sequence looks like this:
- Establish and protect the anchor
- Attach the main line to the load (or load connection)
- Install the traveling pulley on the load connection
- Run rope back to a fixed pulley or redirect at the anchor
- Add progress capture on the load line
- Test with light tension, then commit gradually
Operating the haul: commands, pacing, and reset cycles
A Z-drag only works well if the team runs it like a drill, not like a tug-of-war.
Use clear commands: Tension, Haul, Stop, Reset. One person should manage the progress capture and watch the system, not pull.
As you haul, the traveling pulley approaches the fixed end and you lose travel. That’s when you reset: hold the load with progress capture, slack the haul strand, re-extend the traveling pulley away from the anchor, and start again.
Keep your reset cycles smooth and consistent. Jerky pulls cause shock-loading, which damages rope and tests anchors unnecessarily.
If you need a higher-power system, don’t solve it with aggression. Change the rig.
Common Z-drag mistakes that kill efficiency
Most Z-drags fail in practice for three reasons: friction, poor spacing, and bad alignment.
Carabiners used as pulleys, rope running over dirt or rock, and hitches jammed into hardware all cost you.
If your Z-drag feels weak, troubleshoot in this order:
- Is the rope rubbing an edge or the ground?
- Are you using actual pulleys where they matter?
- Is the progress capture hitch biting cleanly?
- Are you pulling in line with the system (not off-angle)?
Small fixes here can feel like adding an extra person to your team.
When 3:1 Isn’t Enough: Piggybacks, 5:1, and Change-of-Direction Tricks
Once you’ve run a clean Z-drag, the next challenge is knowing when to stop forcing it. Sometimes you need more power. Other times you need less friction or a better direction of pull.
Piggybacking a Z-drag without creating a mess
Sometimes 3:1 won’t move the load, especially in mud, snow, or steep, rough terrain.
The temptation is to keep adding rope until it looks complicated enough to work. That’s how teams create tangles and failure points.