Field Sanitation in the Wilderness: Latrine Placement, Hand Hygiene, and Keeping Camp Disease-Free

How Camp Illness Actually Spreads (and Why “Just Be Careful” Doesn’t Work)
The fecal-oral route: the main villain in wilderness camps
Most camp sickness comes down to one simple pathway: microscopic bits of human (or animal) waste getting into someone’s mouth. That sounds dramatic, but it happens in everyday ways-unwashed hands after bathroom breaks, touching a shared spoon, grabbing trail mix from a communal bag, or rinsing dishes too close to a water source.
Related Articles:
Backcountry stomach bugs usually don’t require “gross” behavior. They require one missed step and a high-touch camp culture (shared snacks, shared sunscreen, shared water filters). If you’re leading a group, assume this route is always trying to happen.
Your job is to build a system that blocks it-without relying on willpower.
Quick Summary: If you control waste placement, hand hygiene, and food handling, you prevent the majority of camp-spread illness.
Water contamination: distance matters, but terrain matters more
People often memorize one rule like “200 feet from water” and stop thinking. The problem is that water doesn’t care about your pacing. A latrine on a slope or in sandy soil can leach downhill during rain, snowmelt, or high groundwater.
The risk is higher than many hikers realize because some pathogens survive a long time in cold water and moist soil. The Centers for Disease Control and Prevention has a helpful overview of why handwashing is a core disease barrier, especially for gastrointestinal illness (CDC handwashing guidance).
What “200 feet” is trying to accomplish
- Adds filtration time: Soil can trap and break down pathogens.
- Reduces runoff risk: Less chance waste gets washed directly into streams and lakes.
- Keeps traffic areas cleaner: Camp and trails stay cleaner and more pleasant.
But here’s the catch: if your “200 feet away” spot is in a drainage, a dry creek bed, or anywhere water will flow during a storm, you’ve basically built a contamination slide.
High-touch camp behaviors that quietly spread germs
In many groups, the biggest problem isn’t the latrine. It’s what happens between the latrine and dinner.
Here are a few classic “it seemed harmless” examples:
- Someone snacks while filtering water, then hands the bottle to someone else.
- Everyone shares a peanut butter jar and touches the rim with used spoons.
- Someone uses hand sanitizer but doesn’t rub long enough to be effective.
- A “clean hands” person pumps the filter, then grabs the dirty intake hose.
The fix is not perfection. The fix is obvious, repeatable routines: a hand-cleaning station that’s easier than “walking back to your pack,” a clear “dirty hands vs. clean hands” mindset, and group rules that don’t feel like a lecture.
The most common early warning signs you should take seriously
A little nausea, sudden fatigue, stomach cramps, or multiple people “not feeling great” after the same meal are signals to tighten systems immediately. Don’t wait for full-blown vomiting or diarrhea before you change behavior.
If one person gets sick, assume the environment may be contaminated until proven otherwise. That’s not paranoia-it’s how you keep one case from becoming a group problem.
With that in mind, the next step is building bathroom and hand hygiene setups that people will actually follow.
Latrine Placement and Hand Hygiene Systems You’ll Actually Use
Choosing a latrine location: think like water and flies
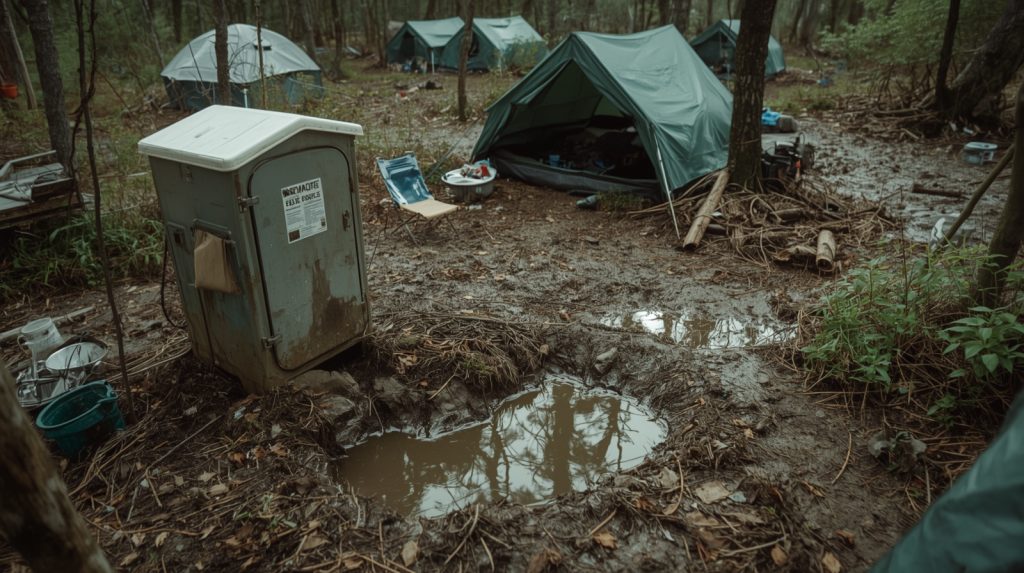
Your goal is to isolate waste from water, food, and people-while still making the bathroom easy enough that everyone uses it correctly. If it’s too far, too exposed, or too unpleasant, people start making “exceptions.”
And in the backcountry, exceptions are where disease spreads.
A solid starting point is the common standard: place human waste sites well away from water, camp, and trails. The USDA Forest Service provides practical guidance on disposing of human waste responsibly on public lands (USFS human waste guidance).
A simple placement rule set that works in real camps
- Away from water: At least ~200 feet (about 70 adult paces) from lakes, streams, and springs.
- Away from the camp kitchen: Far enough that you won’t smell it or walk past it while cooking.
- Away from trails: Out of sight and not in a place where someone will “discover” it later.
- Not in drainage paths: Avoid gullies, dry creek beds, and low points where water concentrates.
⚠️ Warning: Never place a latrine in a dry wash or “obviously dry” channel. It’s dry until it isn’t.
Cat holes, group latrines, or pack-out: picking the right method
Not every trip should use the same approach. A solo hiker can often use cat holes responsibly.
But a base camp with 10 people for a week can overwhelm an area fast, leaving behind a minefield (and a health risk).
Here’s a quick comparison to help you choose:
| Method | Best For | Pros | Cons |
|---|---|---|---|
| Cat hole (individual) | Small groups, low-use areas | Low impact when done right, no shared toilet | Easy to do wrong; can concentrate near camp if people get lazy |
| Group latrine (pit or trench where permitted) | Larger groups, longer stays | Centralized, easier to manage cleanliness | Requires smart placement, rules, and sometimes land permission |
| Pack-out (WAG bags / containers) | Deserts, alpine, high-use zones, required areas | Most sanitary for the site; minimal soil contamination | More logistics, smell management, “ick factor” for some people |
Land managers sometimes require pack-out in sensitive areas, so always check local rules before you go. The National Park Service Leave No Trace resources are a strong starting point for understanding why rules vary by environment and use level (NPS Leave No Trace principles).
Setting up a simple “bathroom zone” that stays clean
Once you pick a location, make it obvious and easy. Ambiguity leads to improvisation.
And improvisation is how you end up with toilet paper “flowers” scattered around camp.
What to include in your bathroom zone
- A clear path and a discreet marker (so people don’t wander everywhere).
- A designated toilet paper and hygiene kit, ideally in a waterproof bag.
- A sealed trash option for packed-out paper (if required/appropriate).
- A hand hygiene station on the return route, not back at the tents.
Common mistake: Only keeping hand sanitizer in the kitchen area. People intend to use it, then forget, then start cooking.
💡 Pro Tip: If your bathroom area is a two-minute walk, hang a small sanitizer bottle at eye level on the way back. Make “clean hands” the default before anyone touches camp gear.
Hand hygiene in the wild: soap vs. sanitizer (and when each fails)
Alcohol-based sanitizer is great for convenience, but it’s not magic. It works best on hands that aren’t visibly dirty or greasy.
After bathroom use-especially if there’s any chance of contamination-soap and water is the gold standard because it physically removes germs.
A practical system is to use both:
- After bathroom: Soap + water when possible; sanitizer as a backup.
- Before cooking/eating: Sanitizer is fast and effective if hands aren’t dirty.
- After handling trash, fish, or raw food: Soap + water if you can.
A quick “field handwash” setup you can build in minutes
- A hard bottle or hydration reservoir with a small pinhole (or a loosened cap) for a controlled pour.
- Biodegradable soap used sparingly (never directly in waterways).
- A dedicated drying bandana.
Drying matters more than people think-wet hands pick up grime fast.
Before You Set Up Camp Checklist:
- [ ] Pick a bathroom zone that won’t drain toward water.
- [ ] Decide cat holes vs. group latrine vs. pack-out based on group size and rules.
- [ ] Create a clear hand hygiene point between the latrine and camp.
- [ ] Establish one simple rule: “Clean hands before touching food or water gear.”
Now that you’ve got the “where” and “what,” let’s get into the part that tends to go wrong in real life: building waste systems that hold up under use.
Building a Cat Hole or Latrine That Doesn’t Backfire
Cat hole depth, diameter, and “the right dirt”
A cat hole that’s too shallow is basically an invitation for animals, rain, and other campers to “discover” it. A hole that’s too deep can slow decomposition in some soils and also makes it harder to fully cover and disguise.
A dependable target is 6-8 inches deep and about 4-6 inches wide (roughly the size of your trowel blade). If you can, aim for dark, organic soil-think forest duff and loamy ground.
That soil is more microbe-rich, which helps break down waste faster.
Quick soil checks before you dig
- Too sandy: Walls crumble and the hole won’t hold shape. Move to more stable soil so waste isn’t easily washed through.
- Too clay-heavy: Sticky and hard to dig, often with poor drainage. If it’s the only option, add extra distance from water and avoid slopes.
- Too rocky: Don’t force a shallow scrape. Switch to pack-out or find a better spot.
If you want a clear standard that matches common land guidance, the Leave No Trace Center for Outdoor Ethics outlines cat hole dimensions and disposal basics here: LNT Dispose of Waste Properly.
Group latrine construction: keep it simple and enforceable
If you’re running a larger camp and a group latrine is allowed, your goal is containment plus compliance. People use what’s easy.
If the latrine feels sketchy, smells terrible, or has no toilet paper plan, you’ll get random “satellite toilets” everywhere.
A practical setup is a single pit or trench in an approved location, with one rule that actually matters: cover waste immediately. That one habit does more for smell and flies than most “creative” solutions.
What to stage at the latrine (so the system runs itself)
- A trowel or shovel that stays there.
- A small container of soil/duff right next to the hole (easy cover).
- A sealable bag/bin for packed-out paper if required.
- Hand hygiene on the return path (not optional, not “somewhere back in camp”).
⚠️ Warning: Don’t place the latrine “conveniently” close to the kitchen just to boost usage. Convenience is good-but not at the cost of food hygiene.
Odor and fly control: your real enemy is exposure time
Smell and flies spike when waste stays exposed, or when people miss the last 10% of the job (not fully burying, not sealing trash, leaving wipes on top). If your camp has flies circling, treat it like a systems failure-not a mystery.
Covering waste immediately cuts odor fast. It also reduces insects landing on fecal material and then landing on your cookware or food.
Simple fixes when odor becomes a problem
- Add more cover material (more soil/duff each use).
- Move the latrine if it’s in direct sun (heat amplifies smell).
- Tighten rules on pack-out trash (TP/wipes are often the true stink source).
When the ground fights back: frozen, alpine, desert, and rock
Some environments don’t allow “standard” burial to work-because the soil is too thin, frozen, or too fragile. In those cases, forcing a bad cat hole is worse than packing out.
If you can’t reliably dig to proper depth, switch strategies. Use a pack-out bag or seek established facilities if they exist.
A helpful mindset is simple: if you can’t do it right, don’t do it “kind of.”
With waste handled, the next sanitation friction point is what people do with paper products and personal hygiene items.
Toilet Paper, Wipes, Menstrual Hygiene, and Keeping the Bathroom Zone Low-Drama
Toilet paper vs. wipes: what actually belongs in the hole
Toilet paper breaks down faster than most “flushable” wipes, which frequently don’t decompose well outdoors. Even when a wipe claims it’s biodegradable, real-world conditions (cold nights, dry air, thin soils) slow everything down.
If you’re in a place where TP can be buried with the waste (and land rules allow it), burying plain, unscented toilet paper tends to create fewer long-term surprises.
In high-use areas or fragile environments, you may be required-or simply better off-packing it out.
A realistic rule you can give your group
- No wipes in the hole unless local guidance explicitly supports it and you’re confident they’ll break down.
- When in doubt: pack it out in a sealed bag.
Pack-out hygiene trash without making everyone miserable
If you tell people to pack out toilet paper but don’t provide a workable method, you’ll end up with buried “just this once” paper or scattered trash.
The trick is to make the pack-out process feel contained and not embarrassing.
A simple approach is a double-bag system:
- A small opaque bag for daily use.
- A tougher outer bag (odor-control bag or heavy-duty zip bag).
If moisture is an issue, add a tiny bit of absorbent material (like a small amount of kitty litter or even a folded paper towel).
💡 Pro Tip: Pre-label a “hygiene waste” bag in your group kit. When people see it’s planned for, they’re more likely to follow through.
Menstrual hygiene in the backcountry (practical, not awkward)
For menstrual products, the most reliable and lowest-impact strategy is to pack out everything-tampons, pads, applicators, and wipes.
Plan for hand hygiene immediately afterward. This is one of those moments where a handwashing setup right on the return path makes a big difference.
If you use a menstrual cup, it can work well in the backcountry, but cleaning needs care. Treat rinsing like gray water (never into streams), and clean hands before and after handling.
Small “privacy + hygiene” upgrades that help a lot
- A lightweight bandana or small ground sheet to keep supplies clean.
- Unscented soap used in tiny amounts with a controlled pour.
- A dedicated sealable bag that isn’t used for anything else.
Don’t forget the trowel: cross-contamination is real
A shared trowel becomes a contamination tool if everyone grabs it with dirty hands, then someone else uses it and later eats a snack.
It’s easy to overlook because it’s “just dirt.” But it’s dirt from your bathroom zone.
If you’re sharing tools, make it part of the routine that the trowel lives at the latrine and that you sanitize hands after use. You don’t need to scrub the trowel constantly-just prevent it from migrating into the cooking area or onto clean gear.
Once the bathroom zone is handled, the kitchen becomes the next big lever. That’s where gray water and dish habits matter.
Gray Water and Dishwashing Without Contaminating Camp
Set up a kitchen system that separates “clean” and “dirty”
The easiest way to keep camp disease-free is to stop thinking of camp as one blob of space. You want zones: kitchen, sleeping, and bathroom.
Inside the kitchen zone, you also want a mental split:
- Dirty tasks: filtering, raw food handling, dishwater
- Clean tasks: eating, storing utensils, sealing clean bottles
A simple example: assign one person to handle dirty water filtration parts and another to handle clean bottles and the final pour. It sounds formal, but it prevents the classic mistake of touching the dirty hose and then touching everyone’s drinking spout.
Dishwashing steps that work even when water is scarce
You don’t need a complicated setup, but you do need an order. Most “dirty dish” problems come from skipping the pre-scrape and turning your wash water into soup.
A reliable 5-step dish routine
- Scrape food completely into trash (pack it out) or into a strainer you can pack out.
- Wash with hot-ish water (if you have it) and a tiny bit of soap.
- Rinse with a controlled pour (don’t dunk clean items back into grime).
- Air dry fully when possible.
- Clean hands after dishes-dishwater is not “clean water.”
If you’re trying to decide how strict to be, remember: norovirus and similar stomach bugs spread easily in close quarters, and contaminated hands are a primary driver. Michigan State University Extension has practical guidance on handwashing and sanitizer use (MSU Extension handwashing basics).
Where gray water goes (and where it absolutely doesn’t)
Gray water should be disposed of away from camp and away from water sources, in a place where it can soak into soil and be filtered naturally.
The goal is to avoid creating a smelly puddle that attracts animals and concentrates bacteria.
A good routine is:
- Walk gray water well away from streams/lakes.
- Broadcast it over a wide area rather than dumping in one spot.
- Strain and pack out food particles (those bits are what animals smell).
Common gray water mistakes to avoid
- Dumping it “just into the bushes” right behind the kitchen.
- Pouring it onto the same spot every meal (creates a cesspool).
- Rinsing dishes directly in a stream or lake.
Handwashing water management: keep it from becoming a mud pit
If you set up a handwashing station, don’t let it turn into a muddy, high-traffic swamp next to your kitchen. That mud becomes the thing everyone steps in and tracks around.
Use a controlled pour and spread wastewater out. If the soil is delicate, move the station slightly each day-especially in longer base camps.
📝 Quick Summary: Strain food, carry gray water away, broadcast it, and keep handwashing runoff from becoming camp’s dirtiest “feature.”
At this point, you’ve reduced your baseline risk a lot. Next comes the moment sanitation really gets tested: when someone in your group gets sick.
When Someone Gets Sick: A Backcountry Containment Plan That Actually Works
Create a “sick lane” so germs don’t take over camp
The moment someone has vomiting or diarrhea, stop treating sanitation as a general best practice and start treating it like containment.
Your goal is to reduce how many surfaces and people get exposed.
Pick one tent or area as the sick zone and keep it downwind and downhill from your kitchen if terrain allows. Ideally, the sick person uses a dedicated route to the bathroom zone so they’re not weaving through where people cook, filter water, and hang out.
The caretaker rule (simple but powerful)
- Choose one caretaker if the person needs help.
- Everyone else keeps distance and avoids “checking in” physically.
- The caretaker treats it like a contamination zone: extra hand hygiene, no shared snacks, and no cooking for the group until cleaned up.
Handling vomit and diarrhea safely (without turning your trip into a biohazard)
In the wilderness, the problem isn’t just the symptoms. It’s what symptoms can splash onto: tent floors, sleeping bags, bootlaces, and hands.
If you can contain waste and keep hands clean, you dramatically cut the odds of the whole group going down.
If vomiting is likely, plan for a container (a pot you can sacrifice, a dedicated bag-lined bucket, or heavy-duty sealable bags). For diarrhea, have a clear toileting plan-pack-out bags can be the most controlled option when urgency is high.
Disinfection options that are realistic in camp
- Alcohol wipes/sanitizer: Useful for hands and small items, but not ideal for heavily soiled surfaces.
- Bleach solution: Very effective when mixed correctly, but store it safely and keep it away from streams.
- Dedicated “dirty gear” bag: Sometimes the best move is containment until you’re home.
For norovirus-level bugs, cleaning and disinfecting hard surfaces matters. The CDC explains why outbreaks spread fast and what stops them (CDC norovirus prevention).
⚠️ Warning: Don’t rinse contaminated items in a creek “to get it over with.” You can pollute the water source and expose other campers downstream.
Food and water rules when illness shows up
Once someone is sick, tighten your kitchen habits immediately-even if you’re not sure what caused it.
Switch to a no shared snacks rule (no communal trail mix bag, no peanut butter jar). Avoid “everyone grabs” food setups where multiple hands touch the same packaging and utensils.
If you can, designate a “clean hands only” person to handle group meals. The sick person should not prepare food for others, and the caretaker should minimize kitchen duties until they’ve washed thoroughly.
A practical water discipline upgrade
- The sick person gets their own bottle and doesn’t share caps, bite valves, or cup rims.
- One person handles dirty filter parts; another handles clean water containers.
- If you suspect the water source is questionable, be stricter about treatment and keep bottle threads clean.
When to end the trip (and when to get help)
It’s tempting to push through, but gastrointestinal illness can dehydrate people fast-especially kids, smaller adults, and anyone already worn down.
If the sick person can’t keep fluids down, is confused, unusually weak, or showing strong dehydration signs, it’s time to change the plan.
A good field rule: if symptoms escalate or multiple people are sick, prioritize getting to a place where hydration, warmth, and medical help are easier. A “hero exit” that keeps everyone out two more days is how minor illness turns into a real emergency.
Once you’re actively containing illness, the next question becomes: what gear is most likely to spread germs, and how do you clean it without wrecking it?
Disinfecting High-Touch Gear Without Ruining It
Water bottles, caps, and bite valves: the sneaky contamination points
Most people focus on the inside of the bottle and forget the threads, cap underside, and bite valve. Those are high-touch areas handled right after bathroom breaks, filtering, or setting up camp.
If illness is in camp, treat bottle tops like utensils. Don’t share them, don’t set them in dirt, and don’t let “dirty hands” tighten caps on “clean bottles.”
If you’re cleaning at home later, disassemble lids and scrub crevices-those spots hold grime.
Quick field approach
- Keep a small wipe/soap option for cap threads and bite valves.
- Air-dry caps when possible instead of sealing moisture inside.
Water filters and bladders: clean vs. dirty parts must stay separated
Filters often become the hub of cross-contamination because they involve both untreated and treated water.
In a calm camp, people get sloppy: the dirty hose touches the clean bottle mouth, or the clean cap gets set down next to the dirty intake.
In a sickness scenario, make your workflow rigid. Create a “dirty side” (intake hose, prefilter, dirty bag) and a “clean side” (clean bag, bottle mouths, caps). If you can’t keep that separation, you’re better off slowing down and being deliberate.
Don’t forget the hydration bladder bite valve
That bite valve is basically a shared doorknob for germs if you’re not careful. If someone is sick, they use their own system only.
Also: keep bite valves from touching group cookware, maps, or shared gear.
Cookware, utensils, and the “dish rag trap”
Dish rags and sponges can turn into bacteria hotels. If you’re using one, it needs to dry fully and stay out of the dirt.
In many camps, paper towels or a dedicated scrubber that can be aired out is easier to keep sanitary.
If one person is sick, consider simpler meals with less shared handling. It’s not forever-it’s just to get the group through without spreading illness.
Safer shared-meal habits
- One serving utensil per pot, handled by clean hands only.
- No “taste testing” with the cooking spoon.
- Each person eats from their own bowl and keeps it in their kit.
Hands, nails, and micro-habits that make sanitation stick
At an expert level, sanitation is mostly about what you do without thinking.
That means keeping nails short, not licking fingers to open food packets, and not touching your face while cooking.
If you’re leading, you’ll get better compliance by making hygiene easy instead of making it feel like scolding. Put sanitizer where hands naturally pass. Give a quick reminder right before meals. Keep routines predictable.
💡 Pro Tip: “Sanitize, then snack.” It’s a better group mantra than “Don’t be gross,” and people remember simple cues.
With gear handled, you can now tailor your sanitation plan to real-world complications-tight sites, kids, dogs, and group dynamics.
Making Field Sanitation Work in Real Camps (Tight Sites, Kids, Dogs, and Group Dynamics)
Tight campsites and shelters: zone control when space is limited
Sometimes you’re stuck on a tiny pad, in a desert site with fragile crust, or in a shelter where everything is shared.
When you can’t physically separate zones much, you compensate with process.
Create a clear “kitchen line” (food prep stays on one side of a log/rock/tarp edge) and a “gear dump line” (packs and shoes stay elsewhere). Then pick one entry/exit route for bathroom breaks so people aren’t brushing past cookware and food bags.
Shelter-specific reality check
If you’re in a shelter and someone is sick, your best sanitation move may be to relocate-even if it’s inconvenient.
Shared surfaces and close quarters are exactly how outbreaks spread.
Kids and dogs: the sanitation challenges nobody warns you about
Kids are handwashing wildcards. Dogs are adorable germ delivery systems.
Both need a plan that’s realistic.
For kids, bake hygiene into routine moments:
- Bathroom break → sanitize.
- Before eating → sanitize.
- After helping with water or dishes → sanitize.
Also, keep kid snacks in individual bags so they aren’t grabbing into communal food with trail hands.
For dogs, don’t let them roam through the bathroom zone, and don’t let them lick dishes “clean.” If your dog rolls in something or steps in waste (it happens), wipe paws before they enter the tent and keep that wipe trash contained.
A sanitation kit that’s small enough to carry but complete enough to matter
You don’t need a giant “field hospital” bag. You need a few items that let you execute the plan without improvising.
Field Sanitation Kit Checklist:
- [ ] Trowel (and/or approved pack-out bags)
- [ ] Hand sanitizer (enough for the group, not just a tiny bottle)
- [ ] Small soap + controlled-pour bottle setup
- [ ] Nitrile gloves (a few pairs for sick-care or messy cleanup)
- [ ] Sealable bags (at least two sizes for trash and contaminated items)
- [ ] Small roll of unscented TP or tissue + a plan for disposal
- [ ] Dedicated “dirty gear” bag (even a tough trash bag works)
Your practical next steps (what to do before your next trip)
If you want this to be effortless in the field, do two things at home:
- Pack your sanitation kit so it’s always ready.
- Practice your system once (even in your backyard or at a local campground).
On your next trip, give your group a one-minute brief while you’re setting camp:
- Where the bathroom zone is
- Where the hand hygiene point is
- The single rule that matters most: clean hands before touching food or water gear
That tiny upfront effort is what keeps your camp functioning when conditions get messy.