Backcountry Cooking Without Cookware: Stone Boiling, Spit Roasting, and Earth-Oven Methods
When Cooking Without Cookware Actually Makes Sense
Cooking without cookware is less about proving you can and more about solving a real backcountry problem. Maybe your pot got crushed, you forgot stove fuel, or you’re trying to cut weight and still want hot food. The key is understanding that “no cookware” doesn’t mean “no control.”
Related Articles:
Instead of metal, you’re leaning on technique, fire management, and smart food choices. That shift matters because it changes what “success” looks like. You’re not trying to replicate a kitchen. You’re building a simple heat system that can safely heat water, cook proteins, and soften starches without contaminating your meal.
If you plan around those goals, these methods become reliable rather than improvised. And once you’ve used them a few times, they start to feel surprisingly straightforward.
Know Your Legal and Environmental Constraints First
Before you build anything, confirm fires are allowed where you are. Seasonal restrictions can ban open flames completely, and ignoring them is dangerous and expensive. Make it a habit to check local land-management guidance before you leave, and again at trailheads if notices are posted.
Use official fire safety guidance, not hearsay. The U.S. Forest Service outlines prevention, extinguishing, and local rules in their campfire safety guidance. The National Park Service also publishes practical reminders on safe fire practices in their NPS fire safety information.
If fires are not allowed, stop here and switch to no-cook foods. Cooking without cookware still requires a flame and coals for the techniques in this article.
Build a Cooking Setup That’s Cleaner Than the Ground
When you don’t have a pot, sanitation becomes the hidden challenge. Dirt, ash, plant debris, and raw-meat juices can all end up in your food if you don’t set up a “clean zone.” You don’t need medical sterility, but you do need separation.
A simple workflow helps. Think of it like setting up a tiny outdoor kitchen with clear boundaries.
- Cooking zone: fire ring, coals, spit, hot stones
- Prep zone: flat rock or bark “board,” your knife, ingredients
- Clean zone: your finished food resting on a clean surface (fresh bark, a leaf layer you trust, or a dedicated cloth)
If you’re using leaves or bark as a surface, choose materials that are fresh, intact, and not resinous or irritating. Avoid unknown plants that could transfer oils or sap into your food.
Quick Summary: “No cookware” works best when you treat your campsite like a tiny outdoor kitchen with clear zones. It reduces contamination and makes the whole process calmer.
Choose Foods That Match These Methods
You’ll have a much easier time if you pick foods that tolerate uneven heat and don’t require precise simmering. In other words, choose foods that are forgiving.
Good fits include:
- Fish
- Chicken thighs
- Sausages
- Hard vegetables
- Potatoes
- Dumplings made from simple flour-and-water dough
Foods that scorch easily (thin sauces, sugary marinades) tend to burn without a pot.
If you’re going to stone boil (coming up next), plan on foods that can cook in hot water without needing a rolling boil the entire time. Instant rice, ramen, oatmeal, bouillon, dehydrated soup mixes, or sliced vegetables are all realistic.
Pros:
- Works with minimal gear and often minimal weight
- Can cook satisfying, hot meals when a stove fails
- Coals-based cooking can be steady and efficient
Cons:
- Requires time and attention
- Higher risk of contamination if you’re sloppy with surfaces
- Harder to control temperature than with metal cookware
Food Safety Matters More When You’re Improvising
The more “wild” your setup is, the more you should anchor your decisions to basic food-safety rules. If you’re cooking meat, your goal is still to reach safe internal temperatures and avoid cross-contamination.
If you carry a small thermometer, great. If not, use conservative cooking: thicker cuts, longer cook times over coals (not flames), and rest time.
The USDA publishes minimum internal temperature guidance in their safe minimum internal temperature chart. In the backcountry, that chart is a useful reference when you’re unsure whether “it looks done” is good enough.
A practical rule: don’t partially cook meat and “finish later.” Without stable refrigeration, you’re inviting trouble. Cook it fully while you have steady heat and attention.
Stone Boiling Basics: Hot Water Without a Pot
Now that you’ve got a clean workflow and realistic food choices, you can add one of the most useful no-cookware skills: stone boiling. Hot water unlocks a lot of meals, and it gives you a “soft” cooking method that’s hard to replicate with roasting alone.
Stone boiling works by heating stones in the fire, then transferring them into a water container to bring the water up to temperature. You can rehydrate dehydrated food, make broth, cook quick grains, or make hot drinks.
The container is the big question. Traditional options include a bark bowl, a wooden trough, a tightly woven basket lined with pitch, or even a depression lined with a hide.
In modern backcountry practice, you may use a clean, heat-tolerant nonmetal container you already have (for example, a wide-mouth bottle rated for hot liquid). Just be realistic about heat limits and melting risks.
Picking the Right Stones (And Avoiding the Dangerous Ones)
Not all rocks are safe to heat. Some stones contain moisture pockets that expand rapidly and can crack or pop when heated. That’s not just inconvenient; fragments can fly.
Use these selection guidelines:
Good candidates:
- Dense, dry stones found away from water
- Hard igneous or metamorphic rocks (often fine-grained)
- Stones that sound “solid” when tapped together
Avoid:
- River rocks and stones pulled from lakes or streams (often waterlogged)
- Soft, crumbly rocks
- Layered rocks that flake apart easily
A practical field test
If a rock is wet to the touch, near water, or has obvious fractures, skip it. Choose several stones so you can rotate them. That rotation is what keeps your water hot without needing a single huge stone.
Warning: Keep your face and hands back the first time you heat any new stone. If it cracks, you want distance.
Heating Stones Efficiently Without Wasting Fuel
You don’t need a bonfire. You need a coal bed and stones placed where they’ll heat evenly.
Build a small fire, let it burn down until you have a good base of coals, then nestle stones along the edges and partially in the coals. Coals are steadier than flames and create less mess.
A good target is to heat stones until they’re too hot to hold near your hand for more than a second or two. If your stones are only “warm,” you’ll be stuck in an endless cycle of lukewarm water.
A simple rhythm works well:
- Heat 4-8 fist-sized stones
- Move 1-2 stones at a time into the water
- Keep the next batch heating
This prevents the “all my stones cooled at once” problem.
Transferring Stones Without Contaminating Your Meal
This is where most people struggle. If your only tool is a stick, stones will slip, and you’ll splash ash into your water.
The workaround is building a basic “rock tong” or using green-wood tools. These options are simple, fast, and surprisingly effective.
Options that work:
- Two green sticks used like chopsticks (best with textured bark)
- A split-stick clamp (split the end of a green stick and use cordage or a twist of bark as a hinge)
- A forked stick to roll stones onto a flat stick “spatula”
Keep ash out of the container
Before you drop stones in, knock loose ash by tapping them together away from the water. If you can, briefly dip the stone near the surface and swirl once to rinse soot off, then let it fully submerge.
If your water ends up gritty, let it settle for a minute. Pour carefully into another container or drink from the top while leaving sediment.
What You Can Cook With Stone Boiling (Realistic Meals)
Stone boiling shines with “add hot water” foods, but you can push it further if you keep your expectations realistic.
Quick Facts:
- Best For: Hot drinks, soups, instant grains, rehydrating meals
- Difficulty Level: Intermediate (mostly because of stone handling)
- Time: 20-45 minutes depending on fire and quantity
Example meal 1: Backcountry broth bowl
- Heat water via stones
- Add bouillon, dried vegetables, and thin-sliced sausage
- Keep hot by rotating stones for 5-10 minutes
Example meal 2: Oatmeal without a pot
- Make a small container (wooden cup or bark bowl)
- Bring water close to a boil with stones
- Stir in oats, a pinch of salt, and dried fruit
Common mistake: trying to cook thick rice or raw beans. Those need sustained, controlled boiling and time. Save them for an earth oven or for when you have cookware.
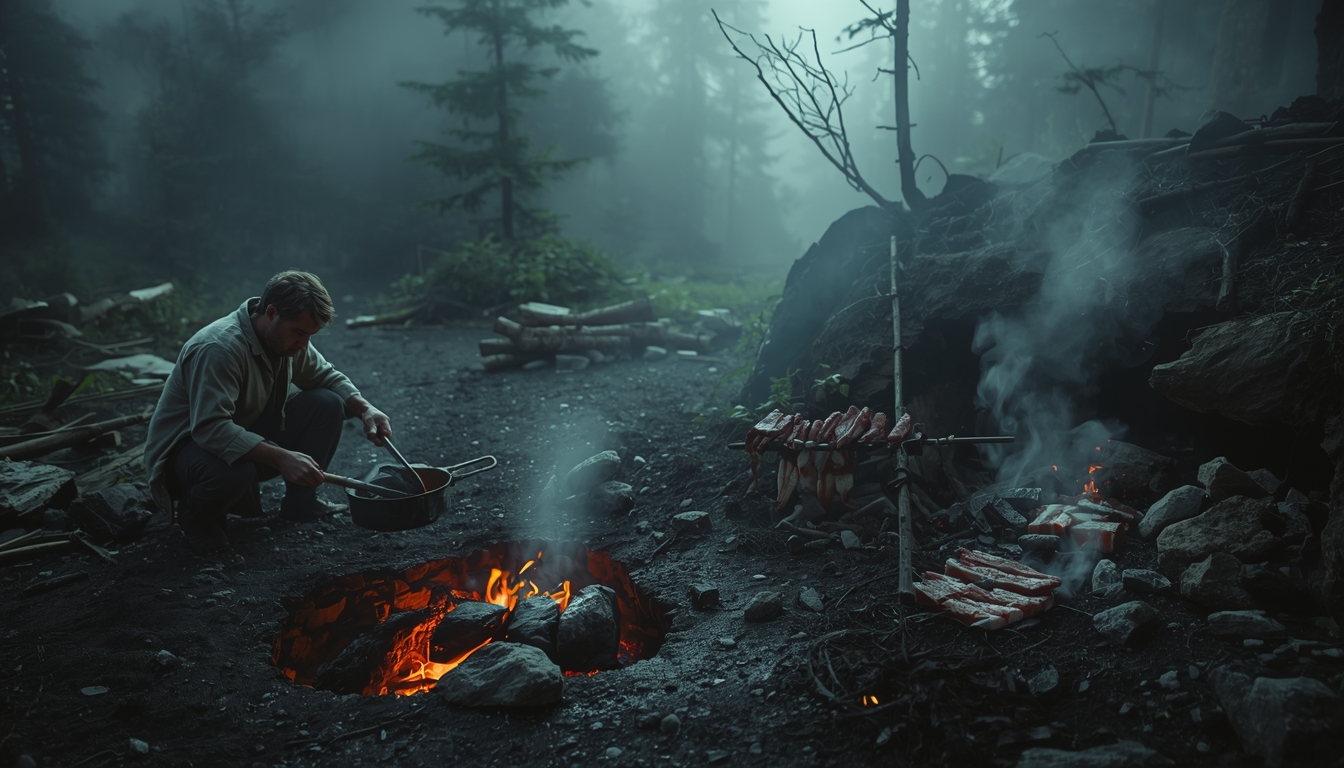
Spit Roasting Fundamentals: Reliable Heat for Proteins
Once you can make hot water, the next step is reliably cooking proteins. That’s where spit roasting shines.
Spit roasting is the workhorse method when you want a real meal without boiling water. It’s also one of the easiest ways to cook meat thoroughly if you build the fire correctly. Instead of fighting flames, you’re using radiant heat from coals to cook gradually.
This method is especially useful for fish, small game, and cut pieces of store-bought meat. If your only food is a raw steak and you’ve got no pan, a spit can still get you dinner.
Building the Right Fire: Flames Are the Enemy, Coals Are the Tool
A common beginner mistake is holding food over big flames and thinking that’s “grilling.” What you usually get is a burnt outside and a raw center.
Coals are what you want. Start with a normal campfire, then let it burn down. When you have a bed of glowing coals with minimal active flame, rake them into a long, even strip.
That strip gives you predictable heat zones. It also makes it easier to move food between hotter and cooler areas without rebuilding anything.
Create heat lanes
Make one side hotter (more coals) and one side cooler (fewer coals). Use the hot lane for browning and the cool lane for finishing thicker pieces.
Pro Tip: If fat starts dripping and flaring, move the spit to the cooler lane instead of fighting flare-ups.
Choosing and Preparing the Spit (So It Doesn’t Fail Mid-Cook)
Your spit needs to be food-safe, sturdy, and not resinous. Fresh green wood is better than dry wood because it resists burning through.
Good choices in many areas include hardwoods like oak or maple. Avoid resin-heavy softwoods (like pine) for the spit itself. They can add harsh flavors and may weaken faster.
Spit designs you can build quickly:
- Straight spit across two forked uprights
- Y-shaped spit where the fork holds the food
- Flat “plank” roasting for fish (a green board leaned near coals)
Before loading food, scrape off loose bark and char-prone bits. If you can, preheat the spit briefly near the fire to dry the surface and reduce sticking.
Skewering and Securing Food So It Cooks Evenly
Food that spins or slides will cook unevenly and can fall into the coals. Thread meat through the thickest section and keep it balanced.
If you’re cooking chunks, pack them tightly so they support each other. That makes turning easier and reduces the chance of one piece dropping off mid-cook.
If you have any cordage, keep it away from direct heat. Natural fiber can burn, and synthetics can melt and contaminate food.
A better approach is mechanical locking:
- Carve small notches where the meat sits
- Use small green sticks as “pins” through the meat to prevent spinning
A simple stability trick
Carve a shallow flat spot along one side of the spit where the meat rests. That flat creates friction and reduces rotation.
Timing, Doneness, and Resting Without Overthinking It
Without a thermometer, you’re relying on time, thickness, and heat intensity. Cook closer to the coals for color, then back off to finish. Rotate often, and don’t rush.
As a rough field guide:
- Fish fillets on a green plank: 8-15 minutes depending on thickness and distance
- Sausages: 10-20 minutes, turned frequently
- Chicken thighs: 25-45 minutes over steady coals, turned regularly
Once done, rest meat for a few minutes on a clean surface. Resting isn’t just a “chef thing.” It lets heat finish the interior and helps juices redistribute so you’re not losing all your moisture when you bite in.
Where Part 2 Picks Up
At this point you’ve got two core skills: making hot water with stones and cooking proteins with coals. The next step is learning how to create longer, more controlled cooking environments for starchy foods and larger meals.
In Part 2, we move into earth-oven cooking (sometimes called pit baking): how to pick a safe location, build heat-retaining rock layers, wrap food with natural barriers, and time a cook so you don’t end up with half-raw potatoes or a scorched roast. From there, you’ll also start learning the small adjustments that keep ash, soot, and grit out of your meals.
Earth-Oven Cooking: Choosing the Site and Building the Heat Base
Earth-oven cooking is where “no cookware” starts to feel less like a workaround and more like a real technique. You’re basically building a contained, slow cooker using hot rocks, trapped steam, and insulated soil.
When you want tender roots, baked dough, or thicker cuts of meat without constant turning, this is the method that makes it possible. The trade-off is time. An earth oven is rarely a quick lunch move, but it’s excellent for camp when you’ll be in one spot for a while.
Picking a Safe Location That Won’t Become a Problem
Start by selecting a spot that’s already durable and appropriate for a fire, not a pristine patch of ground. If a designated fire ring exists and earth ovens are allowed, you can often build near it and use its coals as your heat source.
Avoid peaty soil, root-dense ground, or areas with lots of duff. Heat can creep underground in those conditions. Wind matters too: you don’t need tall flames once you’re baking, but you do need a safe place to build a fire long enough to generate coals and heat rocks.
Quick site checklist
- [ ] Mineral soil or existing impacted ground (not thick organic duff)
- [ ] No overhead branches or low brush that can ignite
- [ ] At least a few steps from tents, packs, and foot traffic
- [ ] A water source nearby for extinguishing and cleanup
Digging the Pit and Planning the Size (Bigger Than You Think)
A common mistake is digging a pit that barely fits your food, then realizing you also need room for hot rocks and insulation layers. Your usable cooking space is always smaller than the hole.
As a practical starting point, dig a pit about 12-18 inches deep and wide enough to hold:
- A layer of hot rocks
- Your wrapped food
- A bit of air space
If you’re baking multiple potatoes or a roast-sized bundle, go wider rather than deeper. That usually gives you better heat distribution.
Heating Rocks for an Earth Oven (Different Goal Than Stone Boiling)
For pit baking, you want rocks that store heat for a long time, not rocks that heat quickly. Flat, dense rocks work well because they create a more even heat bed.
You’ll heat them in a separate fire or right at the pit’s edge, then transfer them once they’re fully hot. Expect the heat-up stage to take longer than you want. If the rocks aren’t thoroughly heated, the oven will start strong and fade fast.
A reliable heat-bed routine
- Build a solid fire and let it burn down to a generous coal bed
- Heat rocks around and within the coals for 30-60 minutes
- Drop a few coals into the pit first (optional, but helps jump-start heat)
- Move in the hottest rocks to form a base layer
Tools You Can Improvise for Pit Work (Without Making a Mess)
You’ll need something to move hot rocks and scoop soil. If you have a small trowel, this is its moment.
If you don’t, you can still get it done with wood. A flat piece of hardwood becomes a serviceable digging paddle. For moving rocks, make two green-wood levers: one to roll and control the rock, and one to guide it.
Work slowly and keep your hands out of the line of travel. Hot rocks have a way of jumping when they hit uneven ground.
Pro Tip: Lay a “work mat” of green branches next to the pit. It gives you a cleaner place to set hot rocks briefly and keeps them from sinking into soft soil where they’re hard to grab.
Wrapping, Layering, and Timing Food in an Earth Oven
Once your heat bed is ready, the whole system depends on layering. You’re building a barrier that keeps ash off your food, traps steam, and prevents scorching.
If you rush this part, you usually end up with either gritty food or burned edges and a raw center. The good news is that once you have a repeatable wrap-and-layer routine, earth ovens become very consistent.
Wrapping Food Without Foil or a Pot
If you have foil, it’s the simplest wrapper. But if you don’t, your alternatives are leaves, clean cloth, bark, or a combination of wet plant material and soil insulation.
Leaf choice matters. Large, intact leaves create a better barrier than small ones that leave gaps. You’re trying to build a sealed package that holds moisture, not a loose bundle that leaks steam.
A practical “no-foil” wrap system
- Inner layer: a clean, non-resinous leaf layer around the food (think steam bag)
- Moisture layer: damp leaves or damp grass to add steam (not soaking wet)
- Outer layer: an additional leaf layer or clean cloth to keep dirt out
If you’re using cloth, keep it clean and avoid synthetics that can melt. A bandana can work in a pinch, but remember it may permanently smell like smoke afterward.
Building the Layer Stack So Heat Moves Evenly
Your basic stack is: hot rocks on bottom, then a protective layer, then food, then insulation on top. That protective layer is what prevents hot spots from directly charring your wrapper.
You can use green sticks as a rack, a layer of damp leaves, or a thin sheet of bark as a separator. The goal is to create a little buffer so heat radiates and steams rather than “brands” the food.
Here’s a simple visual plan:
| Layer | What it does | Field options |
|---|---|---|
| Bottom heat bed | Stores and radiates heat | Hot flat rocks, a few coals |
| Buffer layer | Prevents scorching | Green sticks, damp leaves, bark |
| Food package | Holds moisture, blocks dirt | Leaf wrap, cloth wrap |
| Top insulation | Traps heat | Soil, sand, more leaves |
Timing Common Foods (And How to Check Without Ruining the Oven)
Time is the part that feels vague until you’ve done it a few times. Your actual cook time depends on rock heat, food size, moisture, and insulation thickness.
Start with conservative timing, and resist the urge to open the pit repeatedly. Every peek dumps heat.
A rough timing guide:
- Whole potatoes or sweet potatoes: 45-90 minutes
- Carrots, beets, turnips: 45-75 minutes
- Dough bundles (simple flour-and-water dumplings): 25-45 minutes
- Chicken pieces (thighs/legs): 60-120 minutes depending on size and heat
Checking doneness without dumping all your heat
Open one small inspection corner. Pull a single item from the edge first (like one potato), then reseal quickly. If the edge item is underdone, the center items need more time.
If you cut open meat to check, assume you’ve committed to finishing it right away. Don’t cut it and toss it back for “later.” That increases contamination risk and lets heat escape.
Two Example Earth-Oven Meals You Can Actually Pull Off
Example meal 1: Potato-and-sausage steam bake
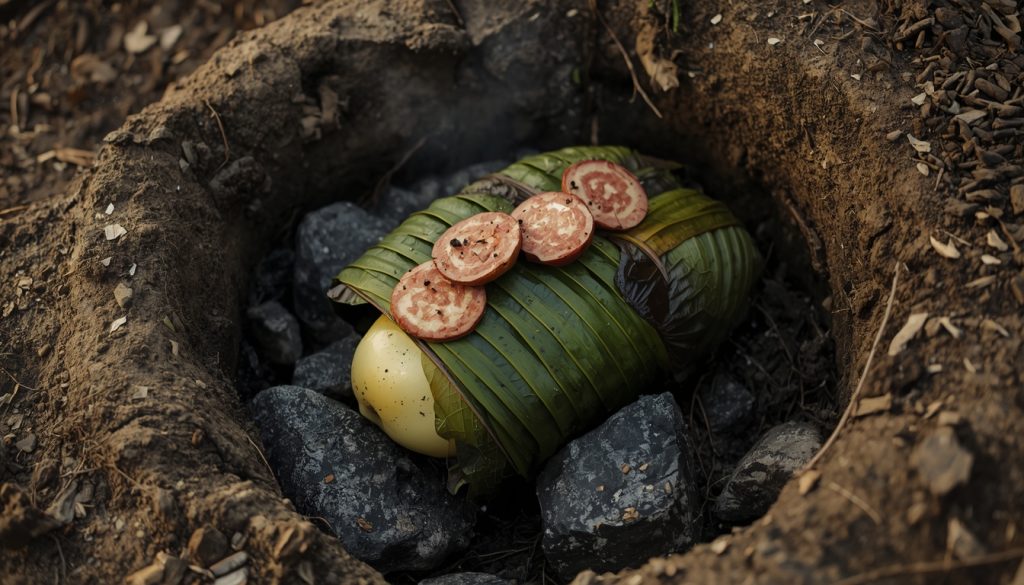
- Slice potatoes thick so they don’t disintegrate
- Add sausage coins and a pinch of salt
- Wrap tight in leaves, then add a damp outer layer
- Bake 60-90 minutes
Example meal 2: Camp “bread rocks” (simple baked dough)

- Mix flour, water, and salt into a stiff dough
- Form palm-sized patties and wrap in leaves
- Bake 30-45 minutes
The dough won’t be bakery-perfect, but you’ll get a filling, hot starch that’s hard to beat when you’re far from a stove.
Troubleshooting Heat, Flavor, and Food Cleanliness Across No-Cookware Methods
By now you’ve got three different heat styles in play: boiling with stones, roasting with radiant coals, and baking with trapped heat. The frustrating part is that the same food can succeed in one method and fail in another.
Troubleshooting gets easier when you diagnose the real issue: heat intensity, heat duration, or contamination. Once you know which category you’re in, the fix is usually simple.
Managing Heat Zones Like a “Backcountry Temperature Dial”
Without cookware, you control temperature mostly by distance and insulation. For spit roasting, you adjust height and coal density. For stone boiling, you adjust the number of stones and how often you rotate them.
For earth ovens, you adjust insulation thickness and the ratio of hot rocks to food volume. If your food is burning on the outside, you’re usually using too much direct heat.
Back the spit away, add a buffer layer in the pit, or use smaller stones more frequently rather than one massive stone that scorches.
Reducing Ash and Bitter Smoke Flavor
Ash in food is almost always a process problem, not an inevitable part of camp cooking. For roasting, switch from flames to coals and keep food out of the smoke column.
For stone boiling, knock ash off stones before they go into the container. For earth ovens, focus on your wrapper and buffer layers. If soil or ash is sneaking in, your wrap is too loose or you skipped the separator layer.
A simple flavor fix that works in the field
Salt early, then add any aromatic items late. Sprigs of herbs, crushed garlic, or onion slices can go into a leaf wrap near the end of the cook if you open the pit briefly.
If you bury aromatics from the start, they can turn sharp or bitter depending on heat.
Avoiding the Most Common Cross-Contamination Mistake
The most common mistake is using the same prep surface for raw meat and ready-to-eat food. When you’re tired and hungry, it’s easy to set a cooked piece back where you were cutting raw pieces.
Create one rule for yourself: cooked food never goes back to the prep zone. Put it on a fresh bark sheet, a clean rock you haven’t used yet, or a dedicated cloth.
Quick Summary: Heat problems are usually solved by distance, buffering, or insulation. Cleanliness problems are solved by zones and never letting cooked food touch raw surfaces.
Where Part 3 Picks Up
With the core techniques covered, the next step is making them consistent under pressure. That means bad weather, group cooking, and clean breakdown.
Up next: how to run these methods when conditions are ugly, how to scale for multiple people without wasting wood, and how to leave the site safe and low-impact afterward.
Making These Methods Work in Bad Weather and High-Stress Situations
The hardest time to improvise is when conditions are pushing you around. Wind, rain, cold, and fading daylight all reduce your margin for error.
If you plan a few bad-weather defaults now, you won’t have to invent them when you’re hungry and tired.
Wind and Rain: Build a Coal System You Can Protect
In wet weather, your goal is not a pretty campfire. Your goal is a protected coal bed that stays hot long enough to cook.
Use natural windbreaks like boulders, a dirt bank, or a shallow depression. Avoid placing a fire under low branches or on organic duff.
If you can find dry wood inside standing dead branches (not from the ground), you’ll get coals faster. Split thicker pieces to expose the dry core and feed the fire with pencil-to-thumb sized fuel until it can sustain itself.
Practical setup that works
- Start with a tight starter-fire footprint to concentrate heat
- Once coals form, expand sideways rather than taller
- Keep a small pile of dry feed wood staged so you’re not searching mid-cook
Cold Weather: Prioritize Methods That Give You Hot Food Fast
In cold conditions, stone boiling often delivers the best return for effort because hot liquid food warms you quickly and rehydrates you at the same time. Spit roasting can be efficient too, but it’s slower if you’re waiting on coals.
If you’re cold and behind schedule, choose foods that cook through rapidly: thin fish, sausage, or pre-cooked proteins you only need to heat. Save earth-oven projects for stable camp, not for “we need calories now.”
Low Light and Fatigue: Simplify Your Menu and Your Workflow
Most backcountry cooking mistakes happen late in the day when you’re rushing. The advanced move is to reduce decisions.
Pick one method and commit. A reliable low-light approach is “broth + protein.” Stone boil water, mix in bouillon or soup base, then add thin-sliced meat that will cook quickly in hot liquid.
You avoid balancing a spit in the dark, and you reduce the chance of dropping food into ash.
Quick decision rule
If you can’t clearly see your fire, your tools, and your food, treat it like a safety issue. Slow down, use a headlamp, and cook something forgiving rather than something that needs precision.
Water and Foodborne Risk: Don’t Let Improvisation Turn into Guesswork
When you’re using natural wrappers, shared surfaces, and improvised tools, your best protection is disciplined separation and adequate heat. If you’re unsure whether something is fully cooked, give it more time and use the hottest, most stable heat source you have.
You can also reduce risk by choosing lower-risk meals when conditions are messy. Hot drinks, oatmeal, and soups are a safer bet than undercooked meat when you’re working in rain and mud.
Cooking for Groups and Getting More Efficiency From Your Fire
Cooking without cookware can feel slow until you start managing heat like a resource. The goal is to stop thinking in single servings and start thinking in fire cycles.
Build one strong coal bed, then use it for multiple tasks before it dies. This approach saves wood, saves time, and keeps the cook area calmer.
Run a “Coal Budget” Instead of Constant Flames
A well-managed coal bed is your battery. Flames are the charging phase; coals are the usable energy.
For group cooking, aim for one sustained charging phase that produces enough coals to support several methods. Then sequence your cooking so one fire does multiple jobs.
A smart sequence looks like this:
- Burn down a strong fire to build a long coal bed
- Start spit roasting proteins over one side (steady, predictable heat)
- Heat earth-oven rocks on the other side (long-term heat storage)
- Use the remaining coals to heat stones for boiling or warming liquids
This reduces total wood use and keeps you from rebuilding fires repeatedly.
Scale Earth Ovens Without Losing Heat Control
For a group, the temptation is to build a huge pit. Bigger can work, but only if you scale the heat bed and insulation layers, not just the hole.
A large pit with underheated rocks is the classic group-fail: everyone waits two hours and still eats crunchy potatoes.
Practical scaling guidelines
- Use more medium rocks rather than a few massive ones (more surface area, more even heat)
- Increase insulation thickness as the pit widens (heat escapes upward faster than you think)
- Pack food in multiple smaller bundles instead of one giant bundle (easier to check and rotate)
If you’re cooking mixed foods, put longer-cook items closer to the center and quicker-cook items near the edges so you can pull them first.
Build Simple “Stations” So Multiple People Can Help
Group cooking fails when everyone hovers over the same spot. Assign roles.
A simple division that works:
- One person manages fuel and coals
- One person handles prep
- One person manages the clean zone and serving
When you don’t have cookware, the clean zone becomes the serving area. Make it obvious and separate. A flat rock with a clean bark layer works, but only if it’s not the same rock you used for raw prep.
Use a Quick Comparison to Pick the Best Method for the Moment
| Situation | Best method | Why it works |
|---|---|---|
| Need hot calories fast | Stone boiling | Rapid warming and forgiving foods |
| Cooking meat evenly | Spit roasting | Easy heat control with coals |
| Cooking roots or dough for a group | Earth oven | Batch cooking with low attention |
| Windy conditions | Earth oven or low spit | Protected heat and less flare risk |
Once you start choosing methods based on conditions, your success rate climbs quickly.
Cleaning Up Responsibly and Building a Minimal No-Cookware Backup Kit
Finishing the meal is only half the job. The other half is leaving the site safe and restoring it as much as your area’s regulations and ethics require.
This is also where you make the techniques repeatable. A few grams of small “helpers” (not cookware) can drastically reduce mistakes.
Break Down the Site So It’s Safe and Low-Impact
Ash, hot rocks, and buried coals are the hidden hazards. Earth ovens can stay hot longer than you expect, and buried heat can persist even after the surface looks cold.
Take time to fully extinguish and cool everything. Spread rocks out so they cool faster, then douse and stir until you can hold material near the center without feeling heat.
If you dug a pit, refill it with the original soil and scatter natural material to reduce the visual impact. For a good baseline on low-impact practices, review the Leave No Trace Seven Principles.
Pack a Tiny “No-Cookware Insurance Kit” (That Still Isn’t Cookware)
You don’t need a pot to make these methods easier. You need a few compact items that improve safety, sanitation, and control.
No-Cookware Backup Kit:
- [ ] Small folding knife (for carving spits, peeling roots, cutting wrap materials)
- [ ] Mini lighter plus backup matches (fire reliability matters)
- [ ] A few feet of natural cord or high-temp aramid line (keep it away from direct heat)
- [ ] A dedicated cloth/bandana labeled “clean zone”
- [ ] Lightweight trowel (pit work, extinguishing, and responsible site restoration)
None of that is cookware, but all of it reduces improvisation mistakes.
Practice at Home Before You Rely on It
The best place to learn stone selection, coal management, and wrap techniques is not 10 miles from the trailhead. Practice in a controlled setting where you can stop, adjust, and try again.
Run one simple drill: cook a potato in a small earth oven, roast a sausage on a spit, and stone boil water for a broth. Time each method and write down what you’d change.
Your second attempt will feel dramatically easier.
Practical Next Steps You Can Use on Your Next Trip
If you want to make this real, pick one method to add to your personal toolkit on the next outing. Don’t try to master all three at once.
- Start with spit roasting if you regularly carry meat or fish.
- Start with stone boiling if you eat dehydrated meals or want hot drinks.
- Add earth-oven cooking when you’re comfortable managing coals and you’ll be camping in one place long enough for slow heat to make sense.
Once you’ve done that, you’ll have a backcountry cooking plan that survives broken gear, forgotten fuel, and unpredictable conditions without turning every meal into a gamble.