Snow Shelters That Don’t Collapse: Quinzhee, Snow Trench, and Snow Cave Construction with Ventilation and Entry Design
Snow as a Building Material: Strength, Sintering, and Load Paths
Why snow shelters fail in the real world
Snow shelters usually fail for boring reasons, not dramatic ones. The roof gets too thin, the shape is wrong, or someone keeps “touching up” the ceiling until it turns into a weak spot.
Related Articles:
In the field, people also pick bad sites. A drift under a cornice, a hollow area over a creek, or a slope that looks harmless until it loads overnight are all common mistakes.
Think like an engineer for two minutes and your odds improve. Snow holds best in compression, not in bending. That’s why domes and arches work, while flat ceilings and sharp corners become liabilities.
Another failure point is time. A quinzhee that hasn’t sintered long enough can feel strong while you carve, then slough off in chunks once the temperature shifts. In winter, patience is part of structural integrity.
Sintering: the “curing time” that makes quinzhees work
Sintering is snow’s version of curing concrete. When you pile snow, the crystals fracture and then bond back together, forming a stronger mass over time.
If you start hollowing out a quinzhee immediately after piling, you’re basically excavating loose aggregate. It may stand for a while, but you’re building on borrowed time.
In practical terms, most quinzhees need at least 1-2 hours of set time after you build the mound. Longer is better when the snow is cold and dry. If the snow is slightly warmer (still below freezing), sintering can happen faster.
A field cue: after sintering, your shovel should cut smoother and the walls should “ring” more solidly instead of crumbling. You’re not looking for rock-hard snow. You’re looking for bonded snow that behaves like a single mass.
Site Selection That Prevents Collapse, Flooding, and Drift Burial
Terrain hazards you can’t fix with better digging
Your shelter is only as safe as the terrain it sits on. If you build in the wrong place, “good technique” won’t save you.
Avoid avalanche paths, runouts, and terrain traps that collect debris. If you’re not confident reading winter terrain, spend time with our breakdown of avalanche terrain for hikers and snowshoers before you ever commit to sleeping under a snow roof.
In military land navigation terms, you want the boring ground. Low angle, anchored by trees (not dead ones), and away from obvious start zones.
Also avoid creek beds and depressions that can flood during a warm-up. Snow insulates, ground heat rises, and meltwater has a way of finding the lowest point-often your sleeping area.
Wind matters too. A shelter that drifts shut becomes a problem at 0200 when you’re tired, cold, and trying to dig your way out.
Micro-site details that make the shelter warmer and safer
Once you’ve chosen safe terrain, pick your exact build spot with wind and drainage in mind. Look for a drift or consolidated bank that’s thick enough to work, but not under loaded branches.
If you want a deeper primer on choosing a secure, comfortable camp footprint, use our guide on shelter site selection and camp layout.
A good micro-site usually has three traits:
- Wind protection: behind trees, a ridge knob, or terrain that breaks gusts
- Natural depth: drifts and banks save calories compared to mining flat ground
- Exit access: you can reach the entrance without climbing steep, icy slopes
One more detail that pays off: plan a spoil pile area for excavated snow. If you’re constantly stepping on your roof zone and compacting it unevenly, you’re creating weak spots without realizing it.
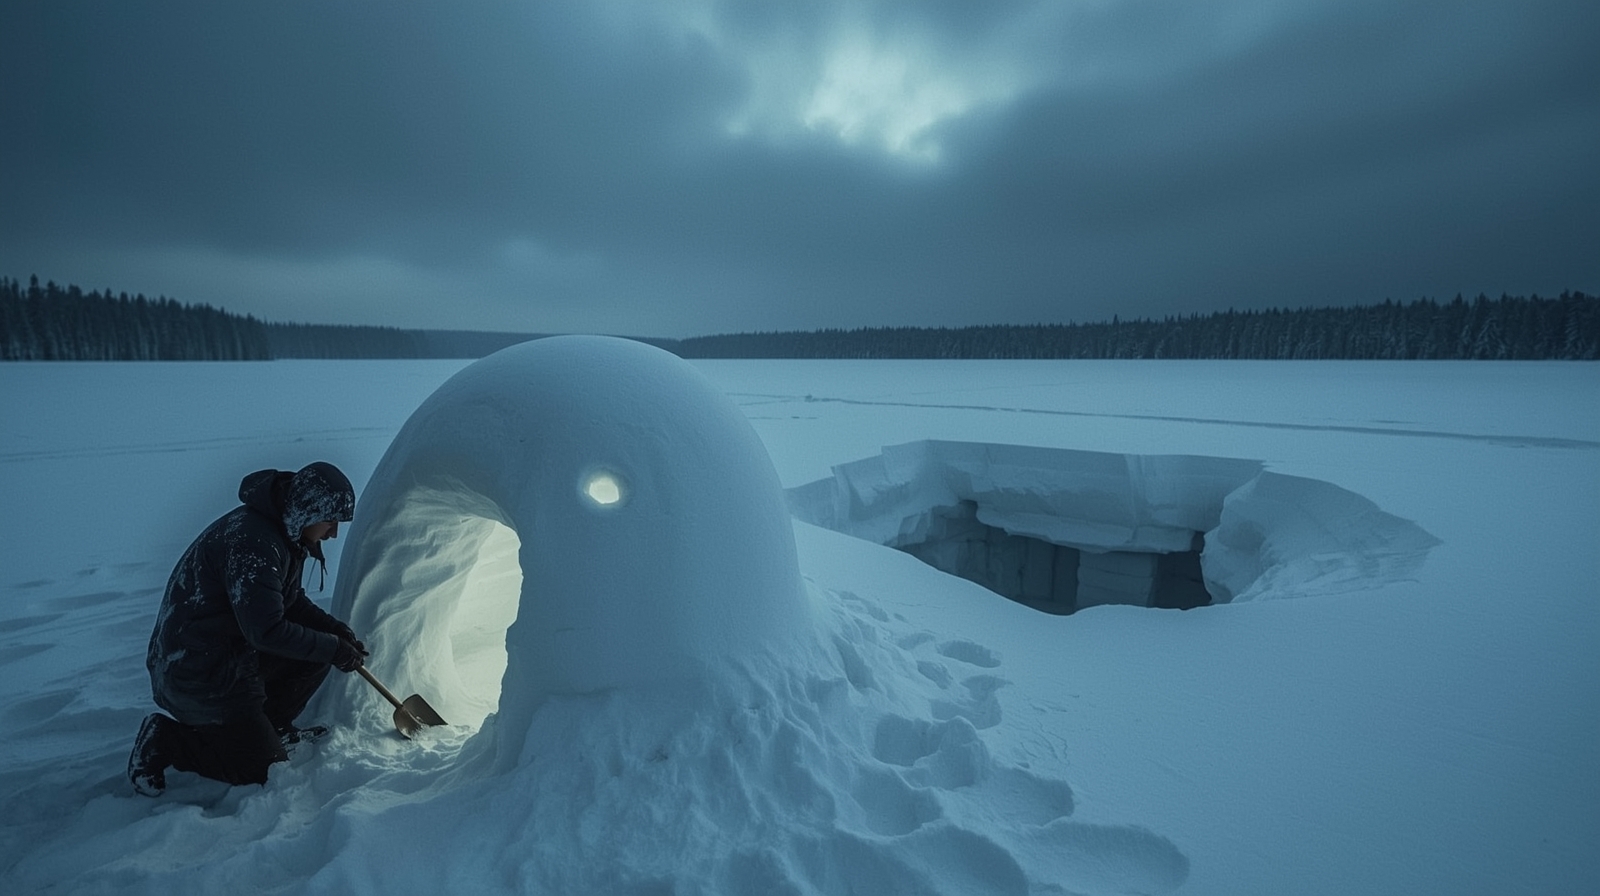
Quinzhee Construction That Holds: Shape Control, Wall Thickness, and Curing
Building the mound the right way (so it doesn’t slump)
A quinzhee is a hollowed mound, not a stacked igloo. That’s good news because you don’t need perfect blocks.
It’s also bad news because your structure depends on mound quality. If the mound is weak, everything you do afterward is damage control.
Start by stomping down a base pad larger than your intended footprint. Then pile snow aggressively, mixing layers. If you only scrape surface powder, you’ll build a weak, sugary mound that refuses to bond.
Pull from different depths and break up crusts so the mound knits together. Then go bigger than you think.
As a planning number, aim for a mound about 7-8 feet across and 5-6 feet high for one to two people. After that, stop and let it sinter.
Thickness gauges and dome carving (the collapse prevention method)
If you remember one quinzhee trick, make it this: use thickness markers.
Before you dig, insert sticks (or tent stakes) into the mound all around at a consistent depth. For most shelters, 10-14 inches is a solid target. In very cold, dry snow, go thicker.
When you carve from the inside, stop digging when you see the end of a marker. That prevents the thin-spot syndrome that causes punch-throughs.
Keep the ceiling a smooth dome with no flats. As you hollow, maintain a slightly raised sleeping platform and a lower cold-air sump near the entrance (more on that later).
When you’re close to finished, compact and smooth the interior with gloved hands. A rough interior increases surface area, which increases melt and condensation.
Snow Trench Shelters That Don’t Pancake: Support Options and Roof Design
When a trench is the right tool (and when it isn’t)
A snow trench is the fastest shelter to get below wind and reduce exposure when you don’t have the snow depth for a true cave. It’s also easy to build wrong by cutting a trench and throwing a weak roof across it.
A trench is the right choice when:
- Snow is shallow to moderate and you can hit ground
- You’re tired, daylight is fading, or you need immediate protection
- Wind is the main threat and you can orient the trench correctly
Avoid trenches in heavy snowfall forecasts or where drifting is likely to bury the roof. Be cautious in very warm snow near freezing as well. In those conditions, roofs sag fast and refreeze cycles can turn a minor problem into a structural one.
A trench is a “get stable, get warm, stay alive” tool. It’s not always comfortable, but it can be safe if you build it with structure.
Roof construction methods that survive settling
The roof is the whole game. Your safest roof option depends on what you have available.
- Ski/pole beam roof: Place skis, snowshoes, or sturdy poles across the trench. Cover with a tarp or spare layer (if available), then pack snow on top.
- Snow block roof: Cut consolidated blocks from a drift and bridge them like a low arch, then pack snow over seams.
- A-frame trench: Cut the trench narrower at the top than the bottom, giving the roof a stronger profile.
Avoid a wide, flat span. Settling snow turns that into a bending load, and snow is not good at bending.
Also build a vent hole through the roof and keep it open. A trench can seal itself tighter than you expect, especially after wind-driven snow.
Snow Caves That Stay Standing: Digging Strategy, Pillars, and Roof Geometry
Reading the drift and choosing a safe cave face
A snow cave works best in a deep, firm drift or bank with enough depth to give you a proper arched ceiling. The biggest mistake is choosing a drift that looks tall but is hollow, layered, or poorly bonded.
Probe first. A ski pole or avalanche probe is ideal, but even a trekking pole helps. You want consistent resistance and enough depth to maintain at least 12 inches of roof thickness.
Choose an entry point low on the drift so your sleeping platform can be higher than the entrance tunnel. This is classic cold-weather practice: warm air rises into the sleeping space, and cold air settles into the lower tunnel.
If you see obvious layering (wind slab over sugary snow), treat it as suspect. Layer interfaces can shear. Your goal is uniform, dense snow.
Digging without weakening the roof
Digging is where people get hurt because it’s tempting to go fast and stand up under a half-finished roof. Slow down and use a deliberate method.
Start with a low entrance tunnel, then widen into a main chamber while keeping the ceiling domed. If the snow quality is questionable, leave a central “spine” or pillar until late in the process.
Remove that support only after the dome is smooth and evenly thick. Keep the chamber small. Bigger is not better if it forces you into thin roof zones.
As you finish, smooth the ceiling and walls to reduce dripping. Build a raised sleeping bench and a cold-air sump near the entrance.
If you’re traveling with a partner, rotate diggers. Overheating and sweating during construction is a fast track to getting dangerously cold once you stop moving.
Ventilation That Works: Oxygen Flow, Condensation Control, and CO Risk
Vent hole placement and maintenance (the part everyone neglects)
Ventilation is not optional. A snow shelter is quiet, windproof, and insulating, which also means it can trap moisture and exhaled CO2.
At minimum, you need a vent hole to the outside that stays open. Place a vent through the roof, not the entry tunnel. A roof vent allows warm, moist air to escape.
Use a stick, ski pole basket, or shovel handle to punch a hole roughly 2-3 inches in diameter. Then maintain it.
Snowfall, wind, and interior frost can close that hole overnight. Make vent checks part of your routine any time you wake up.
If you’re camping with a group, assign the vent check like you would any other critical camp task. In cold weather, tiny failures compound.
Stove and candle reality: carbon monoxide is a real threat
People love the idea of cooking in a snow shelter. Sometimes you can do it safely, but the margin is thinner than most assume.
Any combustion in an enclosed or semi-enclosed space can create carbon monoxide, especially if the flame is oxygen-starved. The CDC is blunt about it: carbon monoxide poisoning can happen indoors and in poorly ventilated spaces, and it can be fatal because you may not recognize symptoms in time. Reference: CDC carbon monoxide poisoning prevention.
If you must run a stove near a snow shelter, do it outside the entrance with airflow. Don’t run it while you’re drifting toward sleep.
Vent holes help, but they’re not a magic shield. Treat ventilation as a system: roof vent, breathable entry management, and conservative stove habits.
Entry Design That Keeps You Warm Without Trapping You Inside
Cold-air sumps, raised beds, and why height matters
Entry design is where comfort and safety overlap. The goal is to reduce wind intrusion while managing cold air that sinks.
In a quinzhee or snow cave, build the sleeping platform higher than the entry tunnel. This creates a cold-air sump: dense cold air settles into the lower tunnel while warmer air stays in the chamber.
It’s not perfect, but it’s noticeable-especially on a still night. In a trench, you can accomplish a similar effect by building a raised bench along one side and keeping the lowest point near the entrance.
Don’t ignore moisture. Put insulation under you. Even a great shelter loses the warmth battle if your ground insulation is weak.
Pair your shelter work with the principles in cold-weather sleep systems without a subzero bag.
Door blocks and emergency exits (because entrances drift shut)
A door block can be as simple as a backpack, a snow block, or a cut slab you slide into place. The point is to reduce wind and spindrift without sealing yourself in.
Never fully seal the entrance airtight. You still need airflow, and you need the ability to get out quickly.
Plan for drift closure. Before you sleep, stage your shovel inside the shelter where you can reach it without digging around for it.
If you only have one shovel in a group, that shovel should stay with the occupied shelter, not outside where it can disappear under snowfall.
In higher snowfall conditions, consider a secondary “poke-out” point: a thinner section near the entrance you could break through if the main door drifts shut. That’s not paranoia. That’s winter realism.
Comparing Quinzhee vs Snow Trench vs Snow Cave (Warmth, Time, Risk)
At-a-glance comparison table for real decisions
Different shelters solve different problems. If you treat them as interchangeable, you’ll pick the wrong one under stress.
| Shelter Type | Snow Depth Needed | Build Time (Typical) | Warmth/Comfort | Collapse Risk | Best Use Case |
|---|---|---|---|---|---|
| Quinzhee | Moderate (you can pile it) | Longer (pile + sinter + hollow) | High when built right | Medium if walls too thin | When you have time and want a durable shelter |
| Snow Trench | Low to moderate | Fast | Moderate | Medium-high with poor roof | Emergency wind break, fast bivy |
| Snow Cave | High (deep drift/bank) | Moderate | High | Low-medium if roof thick | Best option when drifts are deep and firm |
A practical rule: if the snowpack gives you a deep drift, a snow cave often beats a quinzhee for time and effort. If snow is shallow, a trench may be your only workable option.
Pros and cons you should actually weigh
You’ll build faster (and choose smarter) if you’re honest about tradeoffs.
Quinzhee pros
- Works without a drift
- Strong if properly sintered
- Comfortable dome shape when finished correctly
Quinzhee cons
- Time-intensive (pile, wait, hollow)
- Easy to dig too thin
- Requires disciplined thickness control
Snow trench pros
- Fastest to build
- Minimal technique required
- Good immediate wind protection
Snow trench cons
- Roof can fail if the span is too wide
- More exposure to drifting shut
- Often colder than caves/quinzhees
Snow cave pros
- Naturally strong when snow is dense
- Efficient warmth and good wind resistance
- Low profile in bad weather
Snow cave cons
- Requires deep, stable snow
- Drift assessment is a skill you must practice
- Excavation can soak you in sweat if you rush
Tools, Work Rhythm, and Field Discipline That Prevents Accidents
The minimum tool set and what actually matters
You don’t need a specialized arctic kit, but you do need a few non-negotiables. A real shovel is the big one.
Entrenching tools can work in a pinch, but they cost time and calories. In winter, time and calories are safety margins.
Also consider bringing:
- A probe or trekking pole for drift depth checks
- A saw for cutting roof blocks (helpful, not mandatory)
- Extra layers you can vent while digging
If you’re still building your winter kit, browse the site’s Backcountry Safety gear category.
Work rhythm that keeps you from sweating out your insulation
The fastest way to get cold is to get wet. Digging a shelter is basically a workout, and it’s easy to overheat without noticing.
Use a simple rhythm that keeps you dry:
- Vent early: open zippers and dump heat before you sweat
- Rotate diggers: 10-15 minute shifts help prevent overheating and fatigue
- Hydrate: dehydration makes you feel colder and reduces performance
- Do a quick clothing check: before you bed down, swap damp layers if you can
A good shelter is only half the job. The other half is keeping your body and clothing system functional enough to benefit from it.
If you want a broader framework for cold-weather risk management and early warning signs, pair these shelter skills with hypothermia recognition and rewarming priorities.