Keeping Gear Dry in Multi-Day Rain: Moisture-Management Routines for Clothing, Sleeping Bags, and Boots Without Destroying Insulation
Multi-Day Rain Is a Capability Problem, Not a Comfort Problem
On day one, being wet is annoying. By day three, it starts changing your decisions. You move slower because your feet hurt. You stop earlier because you’re cold. You make camp in bad spots because you’re tired of being rained on. That’s how small moisture problems become big safety problems.
From a military perspective, this is familiar territory. Extended wet operations aren’t won by “toughing it out.” They’re won by routine — the same small actions, executed every day, that keep critical systems working. In the backcountry, those critical systems are insulation loft, foot integrity, and the ability to actually recover at night. Let one of them degrade for two days and your whole trip changes character.
This guide gives you a complete moisture-management system: clothing routines, sleeping bag handling, boot care, and the daily drills that prevent accumulation. The goal is not to stay dry. The goal is to stay functional.
The three-word principle — protect, separate, recover:
— Protect what cannot get wet (insulation, sleep layers, electronics)
— Separate wet systems from dry systems at all times — in the pack, in camp, on your body
— Recover every night — dry sleep clothes, proper boot drill, loft restoration
If all three happen every day, sustained rain becomes a maintenance problem, not a survival problem.
Moisture Isn’t One Problem: Three Fronts, Three Different Fixes
If you treat all wetness the same, you’ll chase the wrong fixes. Multi-day rain is a three-front problem. Each front has different behavior, different timing, and a different response. Most gear failures happen because someone addressed one front while ignoring the other two.
Pack Waterproofing With Redundancy: One Failure Shouldn’t Soak Everything
A wet pack interior is the beginning of a downward spiral. The fix is a layered system that assumes one barrier will fail. In sustained rain with multiple water crossings, multiple tent setups, and repeated pack access in wet conditions, something will eventually fail. The system accounts for that.
The waterproofing stack
Wet hands and contamination control
In rain, your hands are almost always wet. If you reach into your sleep dry bag with wet hands, you’re directly transferring moisture into insulation — and you may not notice the effect until night two or three when loft is already compromised. Make one simple rule and enforce it: insulation and sleep clothes are touched only with dry hands. Carry a small microfiber towel in a protected top-lid pocket and wipe your hands before opening the sleep bag.
Clothing Routines: Separate Work Wet From Sleep Dry
Multi-day rain clothing management is not about staying dry. It’s about controlling where moisture is allowed to live. The fundamental discipline is a two-lane system: work layers that can get damp, and sleep layers that are protected absolutely. Without this separation, your sleeping bag absorbs moisture every night until it stops insulating — usually around day three.
The two-lane system
- Hiking base layer (wool or synthetic — never cotton)
- Grid fleece or windshirt midlayer
- Rain shell with mechanical venting
- Rain pants or gaiters
- Hiking socks — rotation pair
- Dedicated dry base layer set (top + bottom)
- Sleep socks — never worn outside the shelter
- Insulated layer (puffy) — not hiked in
- Beanie or buff for sleeping
- Handled only with dry hands
Venting discipline — open early, not when you’re already sweating
Ventilation is always proactive. Open pit zips and front zips before you feel warm, not after. If you wait until you’re sweating, you’re already behind — sweat trapped inside a shell will wet your base layer and chill you during stops more than cold rain would have. For shells without mechanical venting, the only option is pace management and strategic halts to let vapor escape.
Midlayers that tolerate moisture: fleece earns its keep
Fleece is unglamorous but reliable. It insulates when damp, dries faster than most alternatives, and doesn’t collapse when compressed wet. Save your insulated puffy for static warmth — breaks, camp, and emergencies. Hiking in a wet puffy insulation layer is the most common way to ruin your recovery system mid-trip. The puffy’s job is to work when the fleece is already exhausted, not to be worn all day.
Don’t solve clamminess by adding layers. If the problem is trapped sweat, adding insulation raises your core temperature and increases sweat output — accelerating wet-out faster than the cold was doing. Vent first, reduce pace second, add layers only if you’ve genuinely addressed the ventilation problem.
Sleeping Bags and Quilts: Protect Loft and Manage Vapor
Your sleeping bag is your recovery engine. Every other moisture management decision in this guide exists to protect this one piece of gear. In sustained rain, loft protection is non-negotiable — because once insulation is wet, there is no drying it in the field. You manage it by preventing accumulation, not by recovering from a soak.
Down vs synthetic — choose based on your margin for error
| Factor | Down | Synthetic |
|---|---|---|
| Warmth-to-weight | Excellent — the best available | Good — heavier for equivalent warmth |
| Damp tolerance | Low — loft drops significantly when wet | Moderate — retains more function when wet |
| Drying speed in humidity | Slow — requires warmth and airflow | Moderate — faster to shed moisture |
| Recovery from repeated dampness | Requires strict handling and drying windows | More forgiving of routine moisture accumulation |
| Best suited for | Strong handling routines, drier climates, ultralight goals | Wet climates, less experienced wet-ops routines, higher forgiveness |
Hydrophobic down treatments (DWR-coated fill) provide meaningful improvement in resistance to light dampness but are not a substitute for barrier protection in sustained rain. Treat them as an additional margin, not a reason to relax dry-bag discipline.
Chain-of-custody — shelter first, bag last
The rule that prevents most sleeping bag failures: your bag comes out only after you have overhead cover and a dry zone established. Pulling your sleeping bag out “just for a second” while still setting up your tarp is exactly how you catch a rain-saturated gust event that takes days to recover from. The sequence is non-negotiable.
Liners and vapor management
A basic cotton or silk liner keeps body oils off insulation, is easier to wash than the bag, and can add 5–10°F equivalent warmth. It also gives you something lighter to refresh on a drying day. A vapor barrier liner (VBL) is effective in very cold environments where drying is impossible and sweat accumulation is the primary problem — but it requires understanding how your body responds to being sealed in, and it’s not appropriate for most backcountry trips. Start with a basic liner unless you have a specific cold-weather case for VBL.
Sleeping bags fail from accumulation, not single soakings. Condensation drip, damp base layers, wet hands on the shell, and gear stored too close — each one contributes a small amount. After three nights, the total is meaningful. The daily drill at camp restores what each night takes.
Shelter and Camp Layout: Condensation Control and Dry-Zone Discipline
A shelter in multi-day rain is not just a roof — it’s a moisture-control system. How you pitch it, how you lay out the interior, and how you manage inputs (cooking, breathing, wet gear) determines whether you gain or lose ground on insulation dryness each night.
Site selection for airflow and drainage
Avoid low spots where water collects and cold air pools. A slight rise or natural drainage slope prevents ground water intrusion and keeps condensation from accumulating in still air. Don’t camp directly against water unless necessary — riverside humidity stays elevated and drying becomes nearly impossible even in dry weather windows. You want controlled airflow through the site — windbreaks help with weather, but fully sealing a shelter against airflow makes condensation dramatically worse.
Create a mud room and a sleep room — even solo
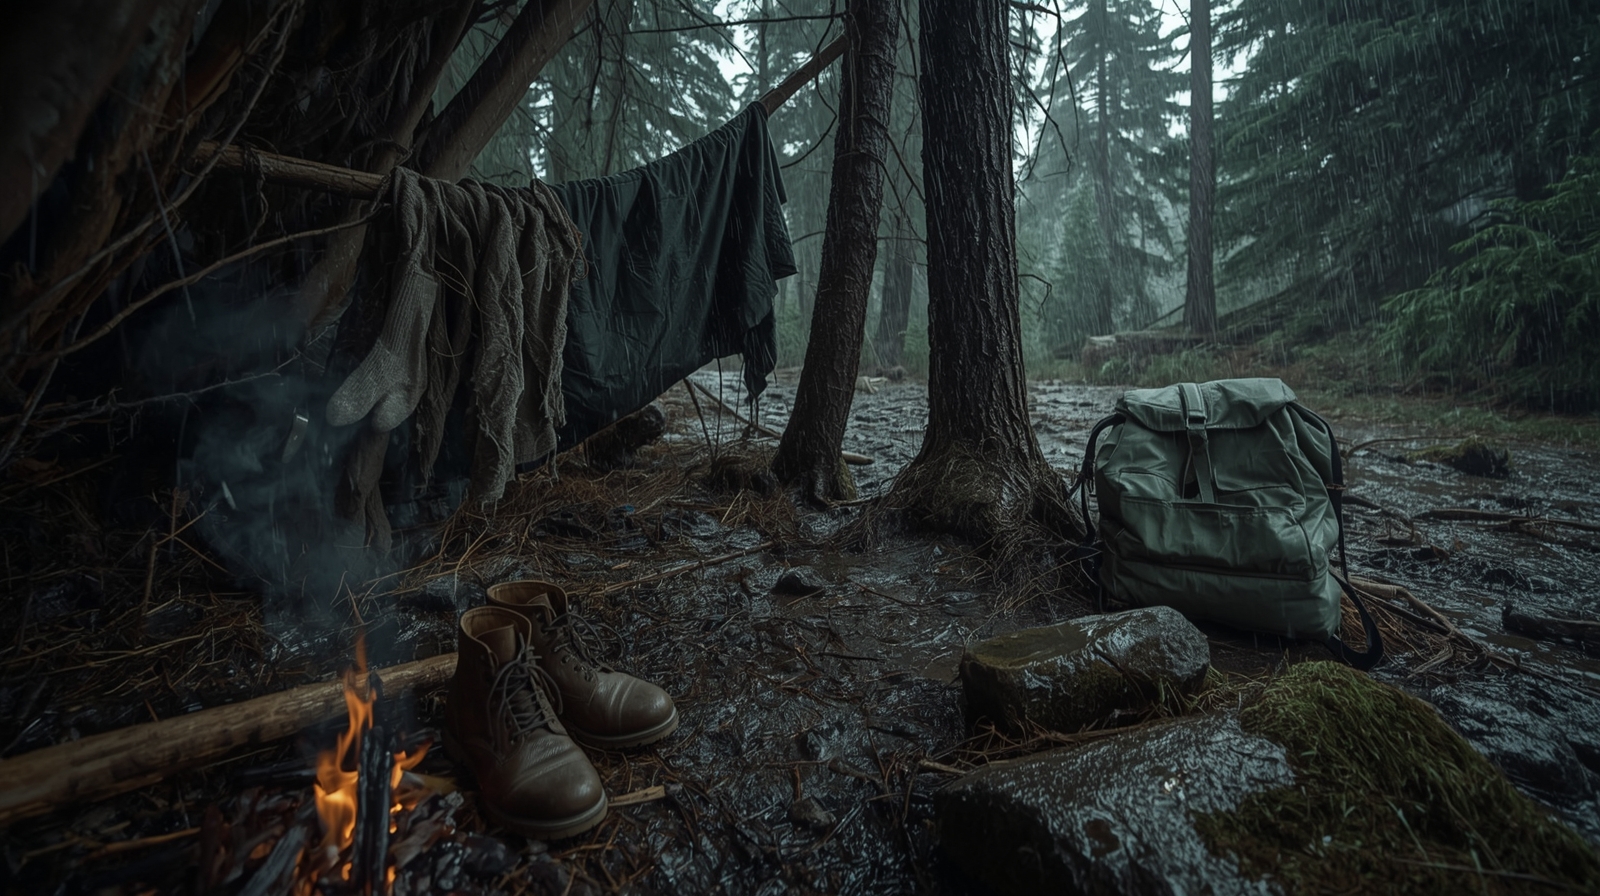
In a tent, the vestibule is your mud room. Under a tarp, dedicate one corner or edge to wet gear and keep your sleep area at the opposite end. The boundary matters even when the distance is small — the discipline of never bringing wet-system items into the sleep zone is more important than the physical separation. In a tent with no vestibule, a pack cover or groundsheet corner outside the door serves the same function.
- Mud room: boots, wet shell, rain pants, wet pack exterior, trekking poles.
- Sleep room: sleeping pad, sleeping bag, dry bag stack, and only dry-hands items.
Cooking and breathing: manage moisture inputs actively
Every breath adds vapor. Cooking adds a large amount in a short time. Vent high and low if possible — crack the door at ground level and the peak vent simultaneously to create a draft that carries moisture out rather than condensing it on cold fabric. Avoid hanging wet clothing over your sleep area where it blocks airflow and drips onto insulation. If you’re running a stove in wet conditions, refer to the guide on cold-weather stove and fuel management for safe windscreen choices and canister performance in cold rain.
Never run a stove in a fully sealed shelter. Carbon monoxide is odorless and colorless — you will not smell or see it accumulating. Bad weather is when people make dangerous ventilation decisions. If cooking inside a vestibule or under a tarp, ensure fresh air movement across the stove. Review the CDC’s carbon monoxide prevention guidance before any enclosed-stove use.
Boots and Socks: Keep Feet Functional When Boots Won’t Dry
In sustained multi-day rain, “dry boots” may not be achievable. The goal shifts: keep feet functional, prevent skin breakdown, and use the overnight window to restore as much foot condition as possible. A person with healthy but damp feet can cover ground indefinitely. A person with macerated, blistered feet — who has been sleeping in wet socks — is a medical problem waiting to happen.
Waterproof boots have hard limits
Membranes help in light rain and short crossings, but water enters from the top on long days and from saturated uppers when vegetation is the source. Sweat also accumulates when breathability is limited — a common complaint with full membrane boots in sustained exercise. Once boots are wet inside, they dry slowly in humid conditions. The worst response is high heat — forced drying near fire, hot rocks, or stove heat can soften adhesives, delaminate soles, and shrink upper leather or synthetic materials. The damage is often invisible until the boot fails under load.
Sock rotation and friction control
Carry at least two sock sets: hiking socks and dedicated sleep socks. In genuinely wet conditions, three sets gives better control — wet/hike, damp/rotation, dry/sleep. Wool blends (merino or merino-nylon mix) insulate when damp, resist odor better than synthetic, and maintain texture that reduces friction during extended wet wear. Liner socks under a heavier hiking sock reduce direct friction and give you a drying option — you can dry the liner while wearing the outer sock, maintaining some protection. For the full foot care routine that pairs with wet-sock management, see the guide on foot care for long rucks and multi-day hikes.
Camp boot drill — same sequence every night
- Pull insoles immediately on arrival — they hold more moisture than the boot shell and dry independently faster.
- Wipe out standing water with a bandana or camp rag.
- Loosen laces fully — collapsed boot structure traps moisture and reduces airflow.
- Position boots where airflow reaches them but rain cannot pour into the opening. Under a tarp edge is ideal; vestibule airflow in a tent works.
- If temperatures are near or below freezing, bring insoles and the next day’s hiking socks inside your sleeping bag in a stuff sack. Frozen insoles are a serious mobility problem at first light.
Win condition for feet in sustained rain: dry sleep socks every night and intact skin every morning. Boots can be wet. If feet recover overnight, you can keep moving indefinitely. If they don’t, you’re on a timer toward a medical problem regardless of how good your other systems are.
Daily Drills: Morning, Movement, and Camp — Run the Same System Every Day
In military operations, the teams that stayed effective in miserable weather were the ones whose procedures were on autopilot. They didn’t have to think about what came next — which meant they had cognitive bandwidth left for actual decision-making. The same principle applies here. If your moisture-management routine requires active thinking to execute, it will degrade on day three when you’re tired and cold and just want to stop.
- Wake, eat, and break down everything non-sleep first
- Stage rain gear and top-access items before the liner opens
- Sleep clothes back into dry bag — dry hands only
- Sleeping bag compressed and sealed into its dry bag
- Pack liner rolled/closed, rain gear in external pocket
- Boot drill: insoles in, laces tightened, gaiters if needed
- Start hiking slightly cool — if you start warm, you sweat immediately
- Open vents on climbs, close on ridges, loosen cuffs on hard pushes
- Avoid long exposed breaks that chill and force you into your puffy while wet
- If rain has swollen creeks, don’t improvise crossings — see swiftwater fording guide
- Rotate wet gloves or mitts at breaks to prevent complete saturation
- Shelter up and pitched before anything else comes out
- Groundsheet and pad down — wet zone identified and established
- Boot drill: insoles out, laces loose, staged for airflow
- Change into sleep clothes before touching sleeping bag — dry hands
- Deploy sleeping bag only after overhead cover and dry zone are confirmed
- Shake bag for loft before getting in — check for damp spots and address them
In a group, assign roles at camp. One person sets shelter, one handles water, one stages the wet zone and starts cook setup. Role division reduces the time everyone is standing in rain handling tasks, and prevents the rushed decision-making that leads to shortcuts — like pulling the sleeping bag out before the tarp is up.
Drying Without Destroying: Airflow, Controlled Heat, and Windows
Drying in multi-day rain is less about achieving complete dryness and more about preventing moisture accumulation. Your goal on any given day is to end with no more moisture in critical systems than you started with. A neutral day is a win. A dry-gain day is exceptional.
Airflow is the safest drying method
Even in humid conditions, moving air helps by removing saturated air from fabric surfaces and allowing the next layer of moisture to evaporate. Hang damp items where wind can reach them without exposing them to direct rain — near the edges of a tarp, in vestibule airflow, or on a short ridgeline inside a large shelter. Keep wet items away from your sleeping bag so vapor doesn’t migrate. A simple camp clothesline under the tarp ridge is the single most useful drying tool available.
Controlled heat — warm, not hot
If you have a fire, use it carefully. Keep insulated gear far enough away that it feels warm to the touch, not hot. Rotate items to expose different faces. Watch for the warning signs of heat damage: shiny spots on shell fabric (DWR baking off), curling seam tape, a synthetic smell, or visible fabric shrinkage. Any of these means you’re damaging your gear faster than the rain was. Boots are the most vulnerable — heat can soften the adhesive bonding the midsole and outsole, causing delamination that typically happens mid-trip, not immediately.
Never place boots or insulated gear against hot rocks, near flames, or on stoves. One aggressive drying session can permanently reduce down loft, destroy waterproof coatings, or cause sole delamination. Damage is often invisible until the item fails under load.
Sleeping bag drying windows
When rain breaks — even for 15–30 minutes — use it immediately. Shake the bag to re-loft, open it flat, and expose any damp areas to moving air. If the inner fabric is damp from condensation, turn the bag inside out under cover and let airflow work on the fill side. Your goal is loft restoration and moisture reduction, not complete dryness. Even a partial loft recovery improves thermal efficiency significantly for the night ahead. For down fill-quality standards and care guidance, the International Down and Feather Bureau provides handling reference material.
Common Failure Points on Day Three — Stop the Spiral Early
Most multi-day rain failures are predictable because they follow the same pattern: small compromises accumulate invisibly until day three, when everything degrades at once. If you know what each failure looks like early, you can intervene before the correction requires stopping the trip.
- Tall trash compactor bags (L2 liner)
- Sea to Summit Ultra-Sil dry sacks
- CNOC roll-top dry bags
- Outdoor Research Helium Rain
- Marmot Minimalist with pit zips
- REI Rainier with venting
- Patagonia R1 Grid Hoodie
- Arc’teryx Rho LT Zip Neck
- Icebreaker MerinoFine 150
- Sea to Summit Silk/Blend liner
- Cocoon silk mummy liner
- Snugpak Jungle liner
- Darn Tough Hiker Micro Crew
- Smartwool PhD Outdoor Heavy
- Wigwam Cool Lite Hiker
- Outdoor Research Sureshot Mitts
- Marmot PreCip waterproof mitts
- OR Rocky Mountain Low Gauntlets
- PackTowl Personal S/M
- Sea to Summit DryLite S
- Rainleaf compact towel
- Peet Boot Dryer inserts
- Cedar boot trees (moisture + odor)
- Newspaper (improvised, effective)