When Water Treatment Fails: What to Do If Your Filter Freezes, Clogs, or Can’t Handle Viruses (Field Workarounds Included)
Why Filters Fail in Real Terrain (And Why It’s Usually Your Workflow)
Water treatment fails at the worst possible time: when you’re tired, cold, behind schedule, and already rationing calories. In training and in the backcountry, the pattern is the same. People don’t get sick because they “didn’t know water could be bad.” They get sick because their plan depended on a single point of failure-and nobody rehearsed what happens when that plan breaks.
Related Articles:
A filter freezing, clogging, or falling short on viruses isn’t rare. It’s normal. The fix is not panic-buying a different gadget. The fix is building a simple, layered workflow and knowing what to do when the primary method goes down.
Quick reference: the three failure modes – Frozen filter: treat it as compromised until proven otherwise; switch to boil/chemical/UV. – Clogged filter: restore flow with proper backflush/cleaning and aggressive pre-filtering. – Virus gap: use a method rated for viruses (boil, chemical, UV, or purifier) based on temperature and water clarity.
Before you troubleshoot gear, it helps to understand why these failures happen. Most “surprises” are predictable once you know the patterns.
Freezing damage is mostly invisible
If your filter contains wet media and it freezes, ice expansion can open micro-cracks or bypass channels. The problem is you can’t see the damage. Worse, the filter may still “work” in the sense that water passes through.
That’s not the same as protecting you.
In the field, treat a frozen filter like a helmet that took a hard impact. It might look fine, but you don’t bet your health on it. Many manufacturers are explicit about this, and they’re not being dramatic.
Bottom line: if you suspect a freeze, your filter becomes a convenience item, not a safety item, until you switch to a virus-capable treatment or replace it.
Clogging is a water-source problem, not a filter problem
Clogging happens when your source has suspended solids-glacial silt, tannin-rich swamp water, sand, algae, or fine organic debris. Those particles load the filter surface and reduce flow. Then you start squeezing harder, you blow seals, or you start taking shortcuts.
This is where field discipline matters. You don’t “muscle through” a clogged filter. You slow down, change the intake method, and start pre-treating the water before it hits your filter.
The best fix for clogging isn’t cleaning. It’s preventing the filter from seeing that much junk in the first place.
Viruses are a different category of threat
Most backpacking filters are designed for bacteria and protozoa. Viruses are much smaller, and many filters aren’t rated to remove them. That matters more in areas with human contamination risk:
- High-use trails and crowded camps
- Downstream of towns or roads
- Agricultural runoff and livestock areas
- Disaster settings with compromised sanitation
If you’re using a filter that isn’t a purifier, you need a plan to close that gap. That plan can still be lightweight-you just need to be intentional about it.
What To Do Immediately When Your Water Treatment Goes Down
When something fails, the first few minutes matter. This is where people get impatient and start gambling with “just a few sips.” Instead, run a quick, repeatable decision process.
Start with a quick risk assessment, not a gear assessment
When the filter stops working, the first question isn’t “How do I fix the filter?” It’s: How risky is this water right now?
Your risk is a combination of:
- Source type: spring, creek, lake, puddle, snowmelt
- Upstream activity: camps, towns, livestock, trail traffic
- Time to exit: hours vs. days
- Team condition: fatigue, cold stress, GI symptoms, hydration status
A cold, clear spring above treeline with no camps upstream is a different threat profile than a warm, lowland stream near livestock. If you’re three hours from the trailhead, you can be more conservative with detours. If you’re two days from extraction in winter, you may need a more aggressive, fuel-based plan.
If cold exposure is part of the scenario, treat hydration as part of hypothermia prevention. Dehydration makes you colder, clumsier, and more mistake-prone. Keep that connection in mind as you choose between waiting to boil, moving to a better source, or rationing.
For cold-weather risk management beyond water, keep this bookmarked: hypothermia recognition and rewarming priorities.
Lock in a “no shortcuts” water discipline
In the military, the fastest way to break a unit is to let standards slide under stress. Water is the same.
As soon as treatment fails, people start bargaining:
- “This looks clean.”
- “I’ll just take a few sips.”
- “We’ll treat it later.”
That’s how you get GI casualties that destroy mobility.
Use a simple rule and make it explicit: No one drinks untreated water until a new treatment standard is established. If you’re solo, say it out loud anyway. It sounds goofy, but it stops a tired brain from making a quiet, bad decision.
Then take inventory:
- How much treated water do you have right now?
- How much fuel do you have (stove or fire)?
- Any chemical tabs or drops?
- Any backup container you can use for settling?
That inventory determines your next move.
Switch to the least-complicated backup method first
When the primary system fails, pick the backup method with the fewest failure points. Usually that’s one of these:
- Boiling (if you have fuel and can make heat reliably)
- Chemical disinfection (if you have time and the water isn’t near-freezing)
If you’re already operating in wet/cold conditions, fire becomes a system, not an event. If your ability to boil depends on getting a fire going in bad weather, you need a reliable fire routine.
This is worth reviewing before you need it: wet-weather fire lays and keeping coals alive.
With the immediate actions handled, you can now deal with the specific failure mode: freeze, clog, or virus gap.
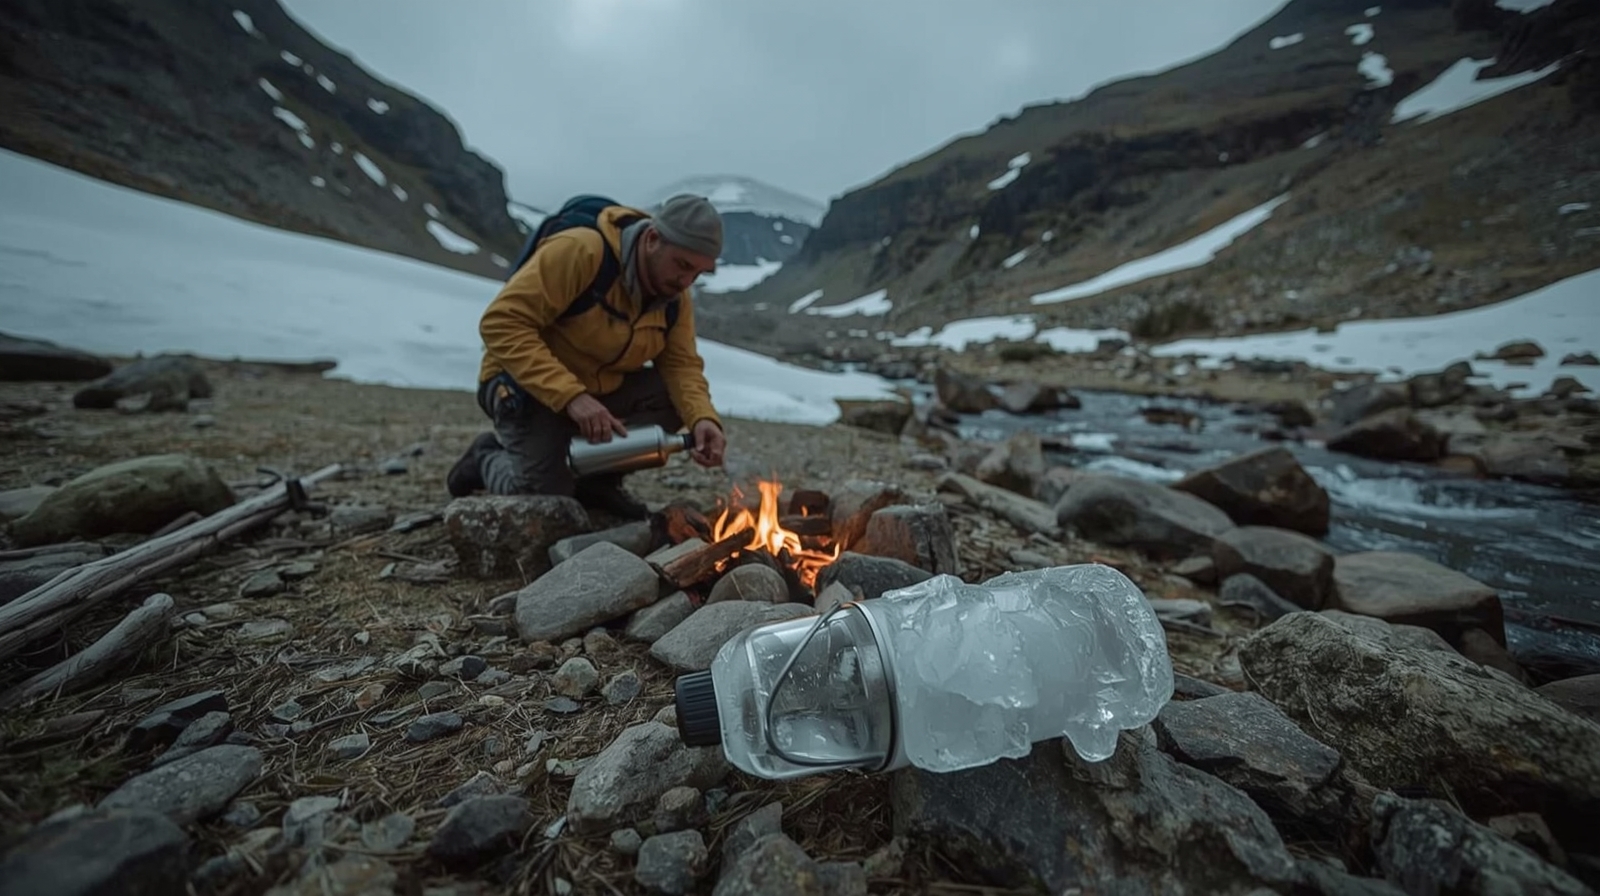
When Your Filter Freezes: Prevention, Decision Points, and Safe Thawing
Frozen filters aren’t just a winter problem. Shoulder-season nights can dip below freezing unexpectedly, especially near water and in drainages. If you plan for it, it’s manageable.
Prevent freezing by treating the filter like a living item
A wet filter in freezing temps needs to be treated like something you can’t leave outside. That means it rides warm:
- In your jacket while moving (inner pocket is ideal)
- In your sleeping system at night
If your filter attaches to a bottle, detach it and store it warm. After each use, shake out as much water as possible. You won’t get it completely dry in the field, but reducing free water reduces the chance of damaging freeze expansion.
A simple habit helps: build a “water treatment check” into your camp shutdown. Same time you stow food and lock down shelter, your filter gets secured in a warm spot. Routine beats memory.
If you suspect a freeze, assume it’s compromised
Here’s the hard standard: if the filter was wet and exposed to freezing conditions long enough to freeze, treat it as compromised. “But it still flows” is not a test. You can’t verify integrity without proper testing equipment.
Make the decision based on what you can do right now:
- If you can boil, boil and bypass the filter entirely.
- If you have chemical disinfectant, use it (and pre-filter water for clarity).
- If you have UV, use it only if the water is clear enough and your batteries are solid.
- If you have none of these, you need to move to a safer source or change the mission plan.
In many winter routes, the safest water is melted snow that you then bring to a boil. It’s labor- and fuel-intensive, but it’s predictable.
Thawing is about restoring flow, not restoring trust
You can thaw a frozen filter to get water moving again, but don’t confuse flow with safety.
Thaw it in a controlled way:
- Inside your layers
- Inside a sleeping bag
- In a pocket close to your core
Avoid placing it near direct flame or high heat. That can warp housings and seals.
Once thawed, you can use it as a prefilter to remove sediment before boiling or chemical treatment. That’s a smart way to preserve fuel and improve taste. Just don’t treat it as your only barrier.
Next up is the other common failure: a filter that technically works, but only as a painfully slow drip.
When Your Filter Clogs: Restore Flow Without Breaking Gear (And Without Cutting Corners)
Clogging doesn’t feel dramatic, but it’s a slow-motion emergency. It burns daylight, increases frustration, and pushes people toward risky shortcuts. The fix is usually simple-if you do it early.
Diagnose the clog: intake habits usually cause it
Most clogs are self-inflicted:
- You dipped the intake in a silty margin.
- You filled from a shallow puddle where sediment is constantly disturbed.
- You scooped from a lake edge with algae mats.
Those sources will choke most filters.
Start by changing the water collection point. Move to the clearest flow you can find. If you can’t, collect water in a container and let it settle. Even 20-30 minutes of settling can drop a surprising amount of sediment to the bottom.
Then draw from the top, not the bottom. Treat your “dirty water” container like a settling tank-not a scoop you shake every time you refill.
Backflushing and cleaning: do it early, not after it’s hopeless
Backflushing works best when the clog is mild. If you wait until flow is a drip, you’ve compacted debris into the media.
Follow your filter’s method:
- Syringe backflush
- Squeeze bottle backflush
- Backflush adapter (if your system supports it)
Use the cleanest water you have for backflushing. If you backflush with dirty water, you’re just rearranging grit.
If you’re in a group, designate one person to run a short maintenance cycle each night:
- Backflush
- Inspect o-rings
- Keep threads and sealing surfaces clean
If your filter has a removable screen or prefilter, clean that first. Many “filter failures” are simply a plugged intake screen.
Pre-filtering is the real fix (and it’s easy to improvise)
If you’re dealing with silty or organic water, pre-filtering is not optional. It saves time, preserves your filter, and reduces the temptation to drink untreated water.
Practical pre-filter options:
- Bandana/cloth over a bottle mouth (catches big debris)
- Coffee filter in a funnel (great for fine grit, but slow)
- A shirt sleeve in a pinch (better than nothing)
- Settling plus decanting (best no-gear method)
Pre-filtering won’t remove microbes by itself, but it will keep your primary treatment working. It also improves chemical and UV effectiveness, which both drop in cloudy water.
Once flow is restored, the last failure mode is the one people miss until it matters: viruses.
When Your Filter Can’t Handle Viruses: Close the Gap With the Right Tool
Most bad water decisions come from assuming “filtered” means “safe.” In many environments that’s close enough. In others, it’s not.
Know what “virus protection” actually means
Viruses are generally smaller than bacteria and protozoa. Many backpacking filters use pore sizes that reliably block protozoa (like Giardia and Cryptosporidium) and bacteria, but not viruses.
If your risk includes human waste contamination, heavy trail use, downstream settlements, or flood/disaster conditions, assume viruses are part of the threat matrix.
In those cases, you need one of these options:
- Boiling
- Chemical disinfection (chlorine dioxide or appropriate bleach dosing)
- UV treatment (requires clear water)
- A purifier rated for viruses
For an authoritative baseline, use the CDC’s emergency guidance: CDC guidance on making water safe.
Boiling is the universal fallback (but it’s a fuel plan)
Boiling is simple and broadly effective. The tradeoff is fuel, time, and heat management.
In freezing conditions, melting snow and then boiling it can chew through stove fuel fast. If you’re using a stove, keep your pot lid on to reduce fuel use. If you’re using a fire, build a stable cooking base and plan for wind.
The “just boil it” advice only helps if you can reliably make heat in your environment.
If altitude is part of your route, remember that boiling behavior changes and cooking times may shift. Keep your overall risk management tight when your body is also dealing with altitude stress. If you’re operating high, this matters: acclimatization and red-flag altitude symptoms.
Chemical and UV are great-if you respect their limitations
Chemical disinfection is lightweight and reliable, but it’s not instant. Cold water slows reaction times, and cloudy water reduces effectiveness.
Some chemicals don’t reliably neutralize Cryptosporidium. That’s why many people combine filtration + chemical in higher-risk water.
UV is fast and convenient, but it needs clear water and functioning batteries. In silty conditions, UV shouldn’t be your primary plan unless you’re pre-filtering aggressively.
For chemical dosing specifics in emergencies, the U.S. Environmental Protection Agency has guidance on disinfecting with household bleach (concentrations vary, so read the product label): EPA guidance on disinfecting water with bleach.
A Layered Treatment Workflow That Doesn’t Collapse Under Stress
A single-method plan is fragile. A layered plan keeps you hydrated even when one piece fails. Think of this section as your “default SOP” you can fall back on when conditions get messy.
Use a “two-barrier mindset” instead of a single gadget
A resilient water plan uses at least two barriers whenever conditions are sketchy:
- Barrier 1 (remove particles): settle, cloth prefilter, filter
- Barrier 2 (kill/inactivate microbes): boil, chemical, UV
This is the same logic as redundancy in communications or navigation. You’re not doing extra work for fun-you’re buying reliability.
A practical example looks like this:
- Silty creek: settle 30 minutes → cloth prefilter → filter → chemical disinfectant
- Clear spring in freezing temps: filter for taste/particles (if not frozen) → boil when in doubt
- High-use trail water: filter → chemical (or boil) to cover the virus gap
If you want a simple standard to remember, use this: clarify first, disinfect second. It keeps your gear working longer and your risk lower when you’re tired.