Food Preservation Without Modern Gear: Smoking, Drying, and Rendering Fat for Multi-Day Survival
Start With the Real Goal: Slow Spoilage, Protect Calories, Avoid Illness
Multi-day survival food preservation isn’t about making gourmet jerky. It’s about buying time by removing what microbes need most: moisture, warmth, and easy access to nutrients. Smoking and drying reduce available water, while rendering turns perishable fatty tissue into a more stable cooking fat you can carry and ration.
Related Articles:
The first mindset shift is that “fresh” meat is only safe for a short window in mild weather. If daytime temperatures are warm, you should assume you have hours, not days.
The USDA’s guidance on temperature danger zones is written for kitchens, but the principle still helps you make fast decisions. Warmer conditions speed bacterial growth and toxin production, and you can’t always “cook it off” later if toxins have formed. For background on why temperature control matters, review USDA food safety resources.
Build a simple preservation decision rule
You don’t need a complex plan. You need a rule that keeps you from hesitating until it’s too late.
Use this quick decision guide:
- If you can’t eat it today, start preserving it today.
- If the weather is warm or insects are heavy, prioritize thin-slicing and drying first.
- If you have time and fuel, add smoke as an extra hurdle against spoilage (and to improve flavor).
Common mistakes that ruin otherwise good food
Most field failures come from process gaps, not bad intentions. People smoke meat “until it looks done” but never dry it enough to store.
Another common issue is case hardening. That’s when thick strips dry into a hard outer shell while the inside stays wet, trapping moisture and creating a rot pocket.
Pro Tip: Preservation works best when you combine hurdles (thin slices + airflow + gentle heat + smoke), rather than relying on one big step.
From here, the next priority is choosing food that preserves well and preparing it in a way that sets you up for success.
Choose the Right Foods and Prep Them for Preservation
Not everything preserves equally well without modern gear. Your best candidates are lean meat for drying/smoking and clean, fresh fat for rendering.
Fish can work, but it spoils quickly and requires extra attention to airflow and insects. Organs are nutrient-dense, but many are harder to preserve safely for days without salt, cold, or steady heat control.
Prioritize lean muscle for drying and smoking
Lean cuts dry faster and store longer because there’s less fat to go rancid. Fat is energy-rich, but it’s also the part that oxidizes and develops off flavors first.
When you’re turning meat into strips for drying or smoking, trim visible fat and connective tissue. In a multi-day scenario, you want protein you can actually keep.
Practical example: if you have a rabbit or small game animal, the backstraps and hindquarters are strong drying candidates. If you have larger game, separate lean muscle groups for drying and set fatty trimmings aside for rendering.
Prep steps that matter more than technique
Field dressing and cleanliness are preservation steps, even if you don’t think of them that way. Keep hair, dirt, intestinal contents, and flies off your food from the start.
Smoking and drying are not magic sterilizers. If you start dirty, you’ll fight problems the entire time.
Use this quick prep checklist before you ever build a smoker:
- [ ] Remove meat from the hide/skin promptly and keep it shaded
- [ ] Trim bruised areas and any contaminated surfaces
- [ ] Slice across the grain into even thickness (thin beats thick)
- [ ] Keep strips separated so air and smoke can reach all sides
For slicing thickness, aim for consistency. Thin strips dry faster and more evenly, which is safer and more reliable. If you’re improvising a knife, focus on making slices uniform rather than perfectly smooth.
With meat prepped, you can move into building a smoker that gives you controlled heat and usable smoke.
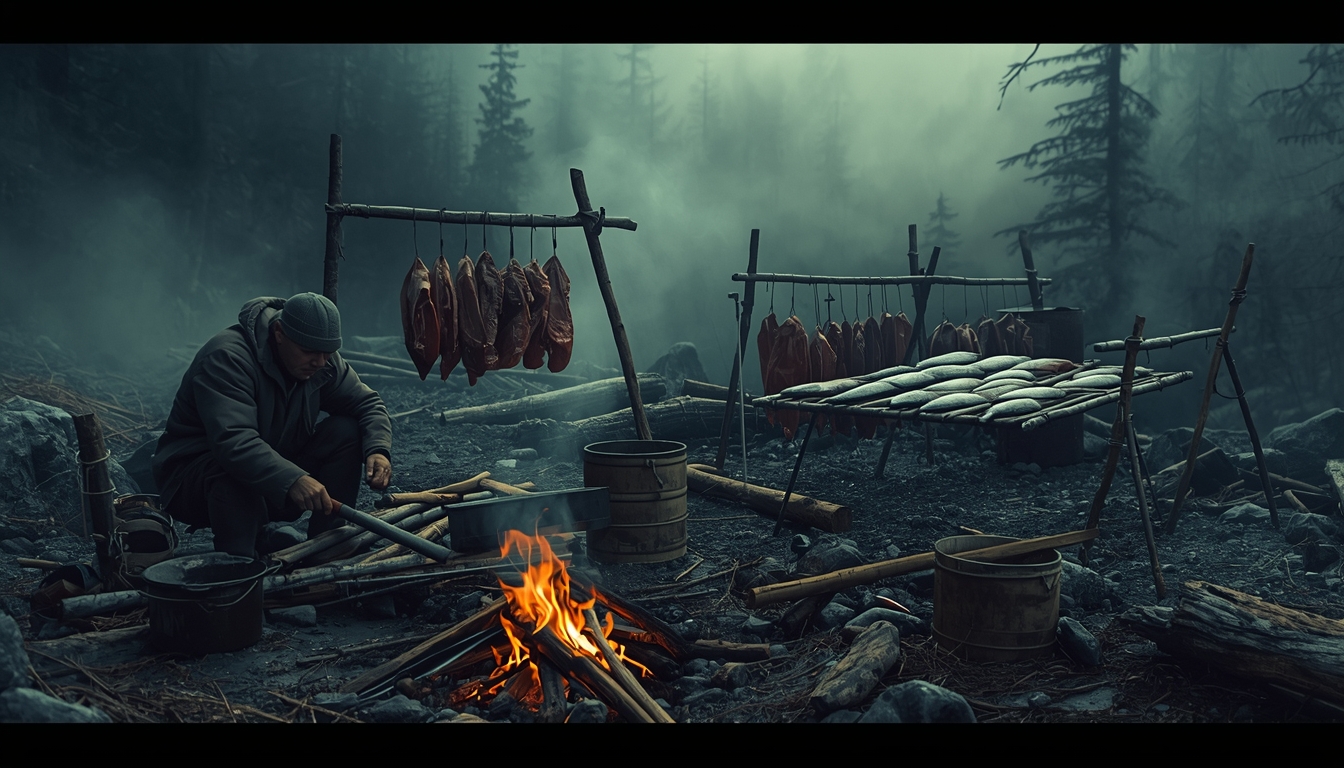
Build a Low-Tech Smoker That Works in Real Conditions
A survival smoker is less about a fancy structure and more about controlling three things: smoke quality, heat level, and airflow. You want cool-to-warm smoke, not open flame licking your meat.
If you cook the outside quickly, you can trap moisture inside. That’s how you end up with food that spoils from the center.
The simplest effective setup: pit + rack
A reliable beginner design is a small fire pit with a green-wood rack above it. Build a shallow pit for coals, then set a rack 18-24 inches above the coal bed.
You can make the rack from green sticks lashed together, or lay parallel green poles close enough that strips won’t fall through. The goal is stability and spacing, not beauty.
To generate smoke, burn hardwood down to coals, then add slightly damp, punky wood or green boughs to smolder. Avoid resinous softwoods (like many pines) for heavy smoking because they can leave bitter deposits.
Keep smoke “thin and steady,” not thick and sooty
Good smoke is usually light blue or barely visible. Thick white smoke can mean your fuel is wet or starved of oxygen, which tends to create harsher flavors and more soot.
Adjust by:
- increasing airflow
- using drier fuel for your coal base
- adding smolder material in smaller amounts
This is also where patience pays you back. A long, gentle smoke combined with drying is more useful than blasting heat for an hour.
Warning: If fat drips onto flames and flares, you’ll spike heat and coat food with bitter smoke. Trim fat and keep flames away from the rack.
Smoking is not the same as cooking
In a gearless scenario, treat smoking as a preservation step that should continue until the meat is noticeably drier and firmer. You can eat smoked meat right away, but if your goal is multi-day storage, you’re aiming for reduced moisture, not just “smoked flavor.”
For deeper technical background on why reduced water activity slows microbial growth, see FDA information on foodborne pathogens and controls.
Once smoke is working in your favor, drying becomes easier to manage-especially if you build a routine around airflow.
Start Drying the Right Way: Airflow, Shade, and Thin Cuts
Drying is often your fastest path to multi-day food because it can work even when fuel is limited. The tradeoff is that drying depends heavily on weather, airflow, and insect pressure.
Done well, it’s straightforward. Done poorly, it becomes a mold-and-maggot magnet.
Choose a drying method that matches your environment
If you have sun, low humidity, and a breeze, air drying can work with minimal heat. If you have damp air, you’ll need either a small amount of heat (a drying rack near a fire) or extended time with excellent airflow.
A simple drying rack can be made by suspending a crossbar between two supports and hanging strips on cordage or split fibers. If you don’t have cordage, you can drape strips over green sticks laid across a frame.
The key is separation. If strips touch, you create damp zones that dry slowly.
Prevent insects without fancy screens
Insects are more than annoying; they’re a food safety problem. If you can’t improvise a fine mesh, your best defenses are smoke, airflow, and timing.
Hang meat where smoke from a nearby smoldering fire drifts across it, and keep it high enough to reduce ground insect traffic. Also, don’t underestimate how much spacing matters.
Here’s a quick comparison to help you choose what to do first:
| Method | Best For | Main Requirement | Biggest Risk |
|---|---|---|---|
| Smoking | Lean strips, fish (with care) | Fuel and heat control | Overheating or under-drying |
| Air drying | Lean strips in dry climates | Wind/low humidity | Mold, insects, case hardening |
| Rendering fat | Fatty trimmings | Steady gentle heat | Scorching, contamination, rancidity |
Pro Tip: If conditions are humid, start with a short smoke to deter insects and begin surface drying, then transition to airflow drying.
Drying and smoking handle the protein side. Next, you’ll get far more mileage out of your food supply if you also learn to preserve fat.
Understand Rendering Fat Before You Try It in the Field
Rendering is one of the most overlooked survival skills because it feels like “extra work.” In reality, it can turn a pile of otherwise short-lived trimmings into portable calories and a cooking medium that makes lean dried meat far more satisfying.
The key is learning what rendering is-and what it is not.
What rendering does (and doesn’t) do
Rendering separates pure fat from water and solids by melting it gently and letting impurities settle out. Properly rendered fat is clearer and stores better than raw fat.
You can use it to fry, enrich stews, or mix into dried meat for higher calories. However, rendering doesn’t automatically make bad fat safe.
If the fat is dirty, old, or contaminated during processing, it can still spoil or taste off. Clean handling matters as much as heat.
The field-ready setup you’ll use later
You don’t need a metal pot to understand the workflow, but in practice a container that can handle heat makes life easier. If you do have a pot (or can improvise a heat-safe container), cut fat into small pieces, heat it slowly, and avoid browning.
The sign you’re on the right track is steady melting with minimal smoke and no burnt smell. You’re aiming for gentle heat that coaxes fat out, not a hot fry that scorches solids.
Where Part 2 will pick up
Once you understand the basics, the next challenge is execution: how to control temperature without a thermometer, how to judge dryness for storage, and how to store smoked/dried meat so it doesn’t reabsorb moisture.
In Part 2, we’ll move from starter setups into repeatable, field-tested techniques for deeper smoking, reliable drying in imperfect weather, and a full step-by-step rendering method you can do with minimal tools.
For additional context on safe internal temperatures when you do choose to cook meat (separate from preservation drying), reference USDA safe minimum internal temperature guidance.
Control Heat and Smoke Without a Thermometer
Once your basic smoker is built, the difference between “smoked meat” and “meat that lasts” comes down to heat management. You’re trying to stay in a gentle warming zone where moisture steadily leaves the strips without cooking the outside into a crust.
In the field, you can do that with distance, coal size, and airflow instead of a gauge.
Use distance and coal discipline to stabilize temperature
Start by keeping meat farther from the coal bed than you think you need, then adjust slowly. If you can hold your open hand where the meat sits for about 6-10 seconds before it feels too hot, you’re generally in the right range for drying-plus-smoke.
Build a small coal base first, then feed it little by little. Big fuel dumps create spikes, and spikes create uneven drying.
Tune smoke quality with airflow, not more green wood
If your smoke turns thick and harsh, you usually need more oxygen, not more “smoke material.” Crack open the windward side of your sheltering wall (logs, rocks, or dirt berm) to pull air through.
When you add smolder fuel, use small amounts and wait a few minutes so it stabilizes.
Warning: A smoky, enclosed setup that traps soot can make meat taste bitter and can coat it with residue. Keep smoke moving past the food, not pooling around it.
Once temperature is stable, you can focus on the hardest skill for most people: knowing when drying is actually finished.
Know When Meat Is Dry Enough to Store Overnight and Beyond
Judging dryness is the skill that prevents the most waste. Your goal isn’t brittle “snap like a cracker” every time, but you do want meat dry enough that the interior is no longer soft, wet, or cool to the touch.
Thick pieces can fool you because the surface dries first. That’s why you need a simple system for checking progress.
Combine three quick tests instead of trusting one sign
Use more than one check so you’re not guessing.
| Test | What you do | What you want | What it means if it fails |
|---|---|---|---|
| Bend test | Bend a strip slowly | It bends stiffly and may crack slightly | Too moist inside; keep drying |
| Tear test | Tear the thickest piece | Fibers separate with effort, not mushy | Interior still wet |
| Cool core check | Press the center against your lip | No “cool, damp” sensation | Moisture still present |
If strips pass two tests but the thickest piece fails, don’t store the batch yet. Put the thick pieces back on first and give them more airflow and gentle heat.
Avoid case hardening by rotating and re-slicing
If the outside feels hard but the inside tears like fresh meat, you’ve likely dried too fast. Move meat farther from heat and increase airflow.
If needed, re-slice thick strips lengthwise to expose the interior. That one correction can turn a “maybe” batch into a reliable food source.
Now that you can judge dryness, you can also handle the real-world challenge that ruins most plans: bad weather.
Improve Drying When Weather Turns Against You
Drying works great until humidity spikes, fog rolls in, or rain forces you under cover. This is where most people either give up or overcorrect with too much heat.
You want to keep moisture moving out while preventing re-wetting.
Use a “warm-air tunnel” near the fire
Instead of hanging meat directly over heat, set it beside the fire where warm air rises and moves across it. Build a simple lean-to reflector from green wood and debris behind the drying rack.
This pushes warm air through the drying area instead of letting heat drift up and away. You get more drying power without scorching.
Manage the night problem: condensation and temperature drops
Even in decent conditions, nighttime can reintroduce moisture. If the air cools and dampens, strips can go tacky again by morning.
When that happens, don’t assume they’re ruined. Restart gentle drying as soon as you can.
Use this overnight checklist:
- [ ] If conditions are damp, keep strips under smoke and moving air (not sealed in cloth)
- [ ] Separate pieces so they do not touch
- [ ] If rain is heavy, temporarily bundle in a breathable wrap and resume drying early
For more detail on why humid storage raises spoilage risk, CDC resources on food safety and contamination are a good reference point: CDC food safety information.
Once you can keep meat stable through humidity swings, rendering fat becomes the next lever you can pull to stretch calories.
Render Fat Step-by-Step Without Scorching It
Rendering turns fragile, perishable fat into something you can portion and use deliberately. The intermediate-level challenge is keeping the process clean and slow so you don’t burn solids into the fat or trap water that shortens shelf life.
Plan to render as soon as you have enough trimmings to justify a batch.
Follow a simple, repeatable workflow
Follow this sequence and resist the urge to rush it:
- Cut fat into small, even pieces (smaller renders faster and more evenly).
- Add a small splash of water to your container if you can (it helps prevent initial scorching and boils off later).
- Heat gently at the edge of the fire, not in direct flames.
- Stir occasionally and watch for bubbling (bubbling means water is leaving).
- When the solid bits (cracklings) sink and look browned, you’re close.
You’re finished when bubbling mostly stops and the liquid fat looks clearer. If you rush heat, you’ll get a burnt smell that carries into everything you cook later.
Strain and protect it from contamination
Strain through clean cloth, tightly woven fibers, or even layered plant material in a pinch. Let the fat settle, then pour off the clean top portion if you see sediment.
Keep the container covered while it cools so ash and insects don’t drop in.
Pro Tip: The cleaner your render, the longer it stays usable. Most “rancid in two days” complaints trace back to scorched solids or dirty handling.
With protein drying and fat rendered, you’re ready for the step that makes or breaks multi-day use: storage and rotation.
Store, Ration, and Rotate Preserved Food in the Field
Once you have smoked/dried strips and rendered fat, your next job is preventing moisture re-entry and keeping odors and pests manageable. Storage without modern containers is more about placement and routine than a perfect package.
Think “short cycles” and frequent checks.
Choose storage methods that match your conditions
If it’s dry and cool, you can hang strips in moving air, ideally with light smoke drifting past. If it’s humid or rainy, hanging can backfire because the meat reabsorbs moisture.
In wet conditions, keep strips in a breathable wrap near warmth and resume drying whenever conditions improve.
Rendered fat stores best in a clean container with minimal air space. If you have to use improvised containers, prioritize clean, dry materials and keep the fat out of direct sun.
Use a rotation habit that catches problems early
Every time you stop to eat, inspect your food. You’re looking for tackiness, sour smell, fuzzy growth, or slimy spots.
If something seems off, don’t “average it out” by mixing it with good pieces. Separate it immediately.
A practical routine is to eat the moistest pieces first and keep the driest for later. Next, you’ll build a higher-calorie carry food by combining your dried meat with rendered fat.
Combine Dried Meat and Rendered Fat for High-Calorie Carry Food
Once you can consistently dry meat and render fat, the next step is turning those two ingredients into something that travels well and feeds you efficiently.
The basic idea is simple: very dry, pounded or shredded meat mixed with clean, fully rendered fat. The fat fills air gaps and slows moisture uptake, while the dried meat provides protein and structure.
Build a field-stable mix without guessing ratios
Start with meat that is genuinely dry (stiff, fibrous, not cool-damp in the center). Shred it finely or pound it between smooth stones on a clean surface so it packs tightly.
Mix in warm (not hot) rendered fat a little at a time until the texture holds together when pressed.
A workable starting point is roughly equal volumes of shredded dry meat and liquid fat, then adjust based on how lean the meat is:
- If it crumbles apart when cool, add a bit more fat.
- If it weeps oil or feels slick, add more dry meat and re-pack.
Pack it to reduce air and contamination
Press the mixture into tight cakes or balls and let it cool in a clean, covered container. Store it away from direct sun and check it daily for off odors.
If you’re unsure about long-term safety for any preserved product, review practical guidance from USDA food safety resources and default to conservative decisions.
Now that you have a compact food option, the next challenge is keeping everything stable as the weather cycles.
Make Storage More Durable: Airtight When You Can, Breathable When You Must
At this stage, your biggest enemy is moisture cycling. Dried meat that sits through humid nights and warm days can slowly rehydrate, even if it looks fine at first.
Fat can oxidize faster if it’s constantly exposed to air and heat. Your job is to pick the “least bad” storage option for your conditions.
Use a two-mode storage approach
In dry, cool weather, breathable storage works because it prevents condensation. Hang meat in moving air and keep it separated so pieces never touch.
In humid or rainy weather, breathable storage can backfire. Shift toward tighter packing and brief re-drying cycles.
Here’s a quick guide:
| Conditions | Dried meat storage | Rendered fat storage | Daily action |
|---|---|---|---|
| Dry and breezy | Hang in airflow | Covered container, shaded | Inspect once per day |
| Cool nights, damp mornings | Hang under light smoke | Covered container | Re-dry each morning |
| Wet and humid | Pack in breathable wrap, keep warm | Small sealed container if possible | Re-dry whenever fuel allows |
Use smoke as a “maintenance tool”
You don’t need a full smoking session every day. A short period of light smoke and gentle warmth can push surface moisture off and discourage insects.
Think of it as routine upkeep, especially after a rainy night or heavy fog.
Next up is the part that protects your entire effort: catching spoilage early and knowing what not to gamble on.
Troubleshoot Spoilage Early: Smell, Texture, and the “Do Not Salvage” List
When preservation fails, it usually gives you warnings before it becomes dangerous. Your goal is to spot problems while you can still save most of the batch.
That means separating questionable pieces immediately and resisting the urge to mask issues with extra smoke or heavy seasoning.
Fixable problems and what to do next
If meat feels tacky or flexible again, that’s often rehydration, not permanent spoilage. Separate the damp pieces and return them to gentle heat and airflow.
Rotate more often and thin-slice any thick sections that keep lagging behind.
If you see a dry surface but suspect a moist interior, split the thickest strip lengthwise and check the center. Re-drying after a day or two is normal in field conditions, especially when weather shifts.
Treat re-drying as part of the plan, not as a sign you failed.
Problems you should not gamble on
Some signs are a hard stop in a survival context:
- Slimy surface or sticky film that doesn’t dry away
- Strong sour, rotten, or ammonia-like odor
- Fuzzy growth, colored spots, or spreading patches
- Bubbling or foaming in stored fat, or a sharp rancid smell
If you notice any of these, isolate the item and don’t mix it with the rest. “Cooking it hard” is not a reliable reset if toxins or deep spoilage are involved.
When your instincts say something is wrong, listen. Protect your remaining supply.
Once you know what to discard, you can safely adapt your process for foods that behave differently-like fish and very fatty game.
Handle Special Cases: Fish, Birds, and Very Fatty Game
Some foods demand more precision because their spoilage timeline is faster or their fat content complicates storage. If you plan for those realities up front, you can still preserve them without modern equipment.
You just have to adjust your method.
Fish: thinner cuts, faster processing, more airflow
Fish benefits from quick cleaning and immediate preservation. Open the fish to expose more surface area, remove gills and guts cleanly, and prioritize thin fillets over thick chunks.
Drying fish usually needs stronger airflow and careful insect control. Combine light smoke with steady drying rather than relying on air drying alone.
If the weather is warm, assume fish is a same-day project:
- preserve what you can
- eat what you can’t preserve
- don’t stash questionable fish for “later”
In practice, fish can feed you well for a day or two. But it’s not the easiest candidate for multi-day carry unless conditions are cool and dry.
Fatty animals: split the workload between drying and rendering
With very fatty game, don’t try to dry everything. Trim lean muscle for drying and redirect fatty trimmings to rendering.
That approach prevents rancid, greasy dried meat. If you must dry meat with some fat attached, plan to eat it first and keep it under ongoing light smoke rather than treating it as long-storage food.
At this point, you’ve got the skills. The final step is using them in the right order when you’re tired and daylight is limited.
Put It All Together with a Simple 24-Hour Preservation Plan
When you’re tired, hungry, and short on daylight, a plan keeps you from making random decisions. The goal is to turn a fresh harvest into stable components by the next day: dry protein, clean fat, and a storage routine that holds up through weather changes.
A field-ready sequence you can follow under pressure
Use this progression as your default workflow:
- First hour: clean handling, separate lean meat from fat, start thin slicing
- Midday: begin gentle smoke or warm-air drying while you keep processing
- Afternoon: render fat slowly on the fire’s edge and strain it clean
- Evening: rotate meat, pull finished pieces, re-slice thick ones, keep light smoke moving
- Morning: check for rehydration and re-dry anything tacky before packing
Practical next steps to build the skill before you need it
Practice in controlled conditions with small batches. Time how long your strips take to dry in different weather, and learn what “dry enough” looks like with your own eyes and hands.
The better you get at controlling heat, airflow, and cleanliness, the less food you’ll waste.
If you want one takeaway to carry forward, make it this: preserve early, slice thin, dry thoroughly, and treat storage as an active process. When you do those four things consistently, smoking, drying, and rendering stop being emergency tricks and start becoming a reliable system you can repeat whenever you need multi-day food without modern gear.