Improvised Splints That Actually Hold: Trekking Pole Splints, Pack Frames, Rigging Principles, and Circulation Checks
Splints that hold start with the mission: stabilize, don’t decorate
When someone’s hurt, it’s easy to get busy doing something that looks medical without actually improving the situation. In the field, a splint has one job: prevent the injured area from moving in ways that worsen damage and pain.
Related Articles:
If you build a “splint” that flexes, rotates, or loosens every ten minutes, you’re not stabilizing-you’re adding friction, swelling, and risk. A solid improvised splint is closer to good rigging than it is to a bandage. You’re creating a rigid system with clear load paths, tension that stays tensioned, and padding that protects tissue.
That mindset is straight out of military field problems: if it won’t survive movement, weather, and time, it doesn’t count.
The difference between comfort and immobilization
Comfort matters because pain drives poor decisions. But immobilization is what prevents an unstable injury from becoming a complicated one.
A proper splint limits bending and rotation and controls the joints above and below the suspected fracture. You can often reduce pain dramatically just by stopping the micro-movements that happen with every step.
Use pain as feedback. If pain spikes when the person shifts weight or you lift the limb, assume your splint is not controlling movement well enough.
When improvised splinting is worth the time
If rescue is immediate and you’re on a road with EMS minutes away, a quick, gentle immobilization may be enough. In the backcountry, you’re usually buying time and mobility for an evacuation that could take hours.
Splinting is worth the time when:
- The person must move to safety.
- The terrain is rough and falls are likely.
- Weather is closing in.
- You need to reduce pain to prevent shock and poor decision-making.
Cold exposure changes the equation. Immobilization increases heat loss because the person stops moving, so pair splinting with a warming plan. For that bigger picture, see hypothermia recognition and rewarming priorities.
A quick, honest disclaimer
This is backcountry first aid information, not medical direction. If you suspect a serious fracture, an open fracture, spinal injury, or compromised circulation, prioritize emergency services.
When in doubt, follow a simple order of operations: stabilize, monitor, and evacuate.
For general first aid context from a public authority, the National Park Service has a solid overview of first aid basics.
Rapid assessment: what you’re splinting and what can kill the plan
Before you build anything, you need a fast read on what you’re dealing with. You’re not trying to diagnose like a clinician.
Your decision is simpler: can we splint and move, or do we need to stop, shelter, and call for help immediately?
A common field mistake is assuming it’s “just a sprain” because the skin isn’t broken. Some of the worst fractures I’ve seen in training environments looked like ordinary swelling and discomfort-until you realized the limb wasn’t stable.
With that in mind, start with red flags, then do gentle function checks. After that, you can commit to a moving splint or a waiting splint.
Red flags that demand a higher level of caution
Treat these as escalation triggers:
- Bone ends visible (open fracture)
- Uncontrolled bleeding
- Limb is pale, cold, or mottled
- Loss of sensation (numbness/tingling)
- Inability to move toes or fingers
- Severe deformity or abnormal angulation
- Pain that feels “tight” and worsening
Also pay attention to mechanism. A fall, fast descent, or rock impact can cause major damage even if the symptoms start “manageable.”
A tight, worsening limb should raise your suspicion for compartment syndrome. For an authoritative overview, see the National Library of Medicine’s compartment syndrome information.
Quick stability checks you can do without causing harm
Start with observation. Compare sides and look for:
- Angulation or obvious deformity
- Swelling and bruising
- Guarding (protective posture)
Then ask good questions. Where does it hurt most? Did they hear or feel a snap?
Next, check function without forcing anything. Can they gently wiggle fingers or toes? Can they lightly tap the foot to the ground without collapsing?
Avoid aggressive range-of-motion tests. If the limb is unstable, your job is to stop movement, not confirm how unstable it is.
Decide early: moving splint or waiting splint
A moving splint is built to survive travel. It uses rigid elements, redundant ties, and padding that prevents hotspots over miles.
A waiting splint can be simpler. It’s intended to keep a limb still while you shelter, signal, and manage pain.
If you may need to move, build for movement now. Rebuilding later in wind, rain, or fading light is how small problems become big ones.
Rigging principles that keep splints from failing under movement
Improvised splints fail for predictable reasons. They’re too short, too soft, poorly padded, or tied in a way that loosens.
Fix those four issues and your success rate goes way up. Think like you’re building a load-bearing system: the limb is the “load,” the rigid elements are the “rails,” and your ties are what create structural integrity.
Once you adopt that framing, the build becomes straightforward. You’re not guessing anymore-you’re applying principles.
Immobilize the joints above and below
For a lower-leg injury, you’re not only controlling the shin. You’re controlling the ankle and often the knee.
For a forearm injury, you’re controlling the wrist and the elbow.
This is why trekking poles and pack frames work so well: they’re long enough to span joints. Short sticks tend to splint only the injured segment, leaving the joints free to torque the fracture site.
Padding is structural, not optional
Padding is what allows you to tighten ties without damaging skin, nerves, and blood vessels. It also reduces slipping because padded surfaces create friction.
Use what you have:
- Spare clothing
- Beanie or gloves
- Socks
- Buff or neck gaiter
- Foam sit pad
Pay special attention to bony points: ankle bones, heel, shin crest, kneecap, elbow, and wrist bones. If you can feel the rigid splint pressing there now, it will be worse after an hour.
Tension and redundancy: tie it like you mean it
In field rigging, one tie is never the plan if failure has consequences. Use multiple wraps and put them where they matter.
Good tie placement usually includes:
- Above the injury
- Below the injury
- At the ends of the rigid rails
- At major contours where slipping starts
Avoid relying on stretchy materials alone. Elastic wraps feel good initially, then swelling changes the game and you either lose stability or crush circulation.
Quick reference: three rules that prevent most splint failures – Use rigid supports long enough to control the joints above and below. – Pad bony points before you tighten anything. – Tie in multiple locations and re-check circulation frequently.
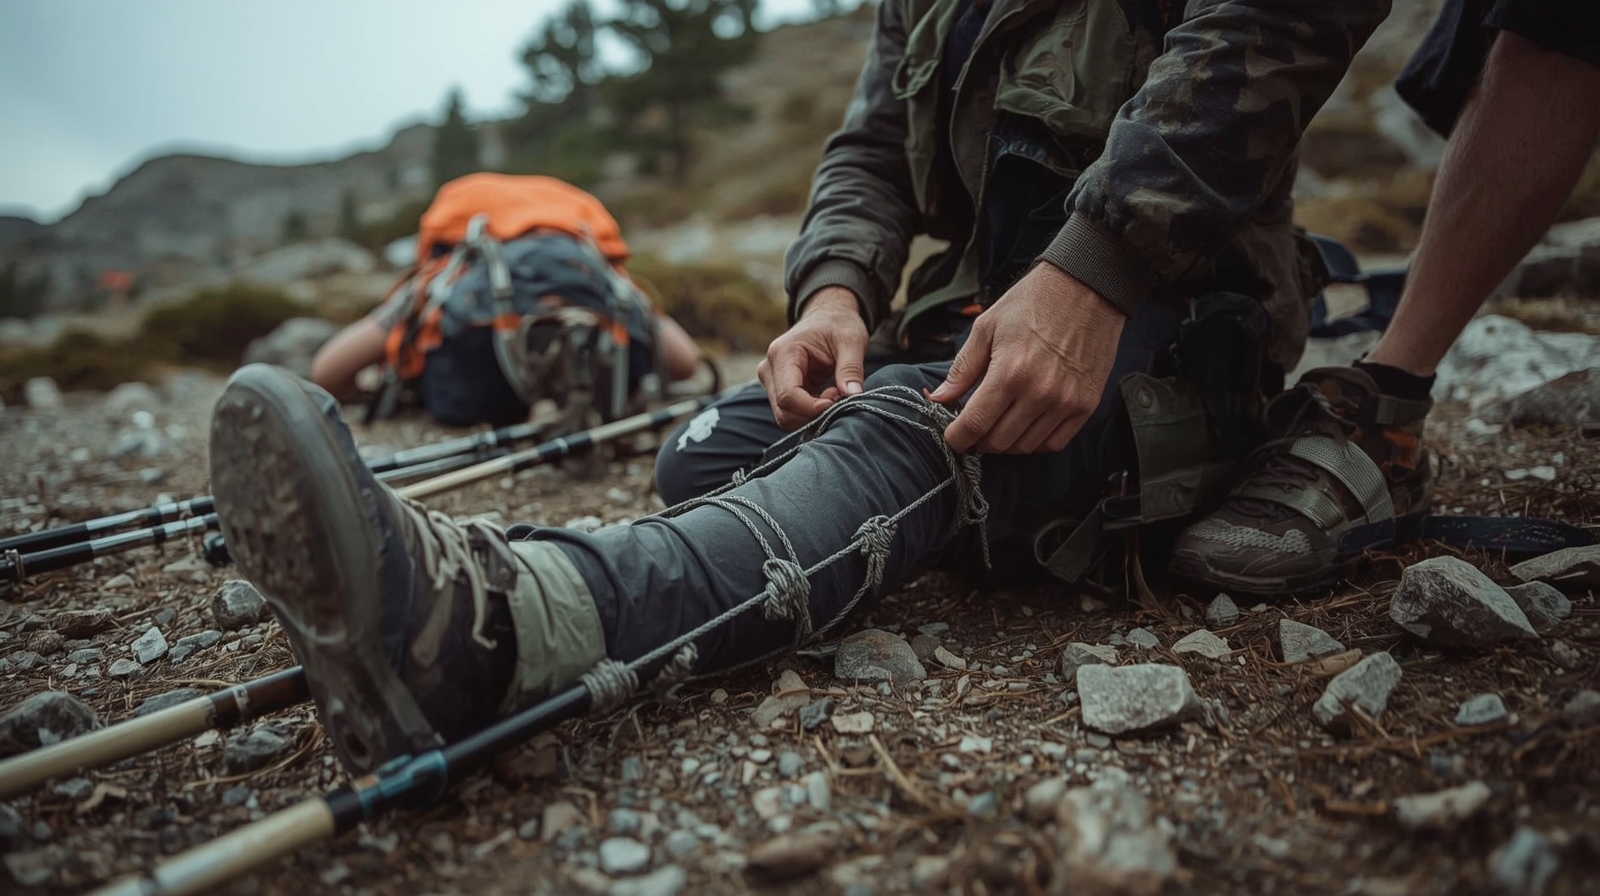
Trekking pole splints: the fastest “real splint” most hikers already carry
If you hike with trekking poles, you’re carrying two adjustable, rigid rails designed to take bodyweight. That’s exactly what you need for many splints.
The key is to stop treating the poles like accessories and start treating them like structural members. Place them to resist bending and rotation, then lash them with stable tension.
From here, you’ll build differently depending on whether you’re splinting a lower leg or a forearm.
Trekking pole splint for lower leg and ankle injuries
For a suspected tib-fib fracture, severe ankle sprain, or unstable lower-leg injury, set the poles to span from above the knee down past the foot if possible.
Place one pole on the outside of the leg (lateral) and one on the inside (medial). Pad heavily around the ankle and shin.
If you can’t span past the foot, at least control the ankle with a figure-8 wrap around the foot and poles. Use clothing to pad the malleoli (ankle bones) and the heel.
Tie placement that tends to hold well:
- Above the knee (if tolerated)
- Below the knee
- Mid-shin
- Above the ankle
- Across the foot
After tying, test gently by trying to rotate the foot. The splint should resist without causing sharp pain.
Trekking pole splint for forearm and wrist injuries
For a forearm fracture or serious wrist injury, use one pole as the main rail. Extend it from mid-hand (past the wrist) to above the elbow if you can manage length and comfort.
Pad the wrist bones and elbow. Tie at the hand (without crushing fingers), at the wrist, mid-forearm, and above the elbow.
Then use a sling (shirt, triangular bandage, or jacket) to support the arm against the body.
Remember the hierarchy: the pole is the splint; the sling is support. If the pole shifts in the sling, add another tie or anchor it to the torso.
Stabilizing the pole tips and locking adjustments
A common trekking pole failure is the adjustment slipping. Before you lash, lock the pole sections hard.
If you have tape, wrap the adjustment points so they can’t rotate. Then cover carbide tips and baskets so they don’t cut fabric or skin.
Simple covers that work:
- A sock
- A glove
- A scrap of cloth tied over the end
If the tip is near the groin or armpit, pad extra. Those areas bruise fast, and that pain can ruin your evacuation.
Pack frames and backpacks: turning your load-hauler into a medical tool
Not everyone uses trekking poles, but almost everyone has a backpack. Many modern packs have internal stays, framesheets, or removable frame components that can become rigid splint materials.
Even if your pack doesn’t have a removable frame, the pack itself can be used as a stabilizer when combined with padding and proper lashing.
This section is about seeing your pack as a toolbox, not just a storage bag.
Using internal stays, framesheets, and sit pads as rigid elements
If your pack has aluminum stays, remove them carefully and keep the hardware with the pack so you can reassemble later.
Stays are excellent for forearm splints and can work for lower leg injuries if they’re long enough.
A framesheet or foam back panel can become a semi-rigid splint for ankle and lower leg injuries when paired with stiffeners:
- Sticks
- Tent stakes
- A cooking spatula or similar rigid tool
A foam sit pad is also useful as a circumferential wrap that reduces rotational movement.
The advantage of pack components is their flat surface area. Flat surfaces distribute pressure and reduce the “rail digging in” effect you get with round sticks.
The backpack-as-splint approach for lower leg problems
If the injury is below the knee and you have no long rigid rails, you can sometimes stabilize by wrapping the lower leg against the pack itself.
Place the pack alongside the injured leg. Add padding between pack and limb, then lash the leg to the pack.
This works best when the pack is reasonably stiff and full. If needed, fill it with soft items to create a stable block.
Avoid cranking ties tight over pack straps and buckles. Those create pressure ridges that become nerve and skin problems. Pad over hardware or reposition so your lash points land on flatter surfaces.
Combining pack frame and trekking pole for a hybrid splint
A high-payoff technique is building a hybrid: one trekking pole on the outside of the leg and one pack stay on the inside, or two stays plus a foam pad wrap.
Hybrid builds shine when you have limited cordage. The more your rigid elements naturally “capture” the limb shape, the less you rely on ties to prevent rotation.
If you want your cordage to be more than a single-use roll of tape, strength and construction matter. The skills in making strong cordage in the field translate directly to emergency lashings.
Lashing materials and knot choices that stay secure (even when wet)
Your splint is only as strong as the connection between rigid supports and the limb. In training, we used whatever held under sweat, rain, and movement.
In hiking reality, you’ll use what you carried for totally different reasons. The fix is to think in layers:
- Soft layer: padding
- Friction layer: cloth or tape to prevent slipping
- Lock layer: cordage and knots that hold tension
Start with the materials you have. Then choose ties and knots that resist creep.
Tape, straps, cordage, and clothing: what works and what fails
Leukotape, athletic tape, and duct tape are excellent because they resist slipping and don’t stretch much.
Pack straps and webbing also work well, especially if you can route them so they pull straight rather than at an angle.
Paracord and accessory cord work, but thin cord can create pressure injuries. Always pad under cord.
Clothing strips can be surprisingly effective if you twist them into a cravat and tie square knots.
What tends to fail in real movement:
- Bungee cords (too much stretch)
- Slick Dyneema line without friction hitches (it creeps)
- Single-wrap ties that aren’t backed up
Knot and wrap patterns that resist loosening
If you know just a few patterns, your splints get more reliable fast. You’re looking for knots that are easy to tie under stress and easy to inspect.
Good, simple options for splint lashings:
- Square knot with long tails (best with flat material like webbing or cloth)
- Clove hitch around a pole, backed up with an overhand (fast anchor on rigid rails)
- Constrictor-style wraps (if you know them) for a firm, non-slipping bind
Wrap patterns that help:
- Two wraps around the splint and limb before tying (adds friction)
- A second “backup” tie a few inches away from the main tie (adds redundancy)
After tying, do a quick reality check. Try to slide the pole a half inch. If it moves easily, it will move a mile later-tighten, add friction (tape/cloth), or add a second tie.