Swiftwater Fording and Pack-Ferry Techniques: Reading Current, Footing Strategy, Team Crossings, and Rope-Assists
Swiftwater risk decisions: when a ford is the wrong answer
A safe crossing starts with an honest go/no-go decision, not foot placement. In military training we treated water obstacles like any other hazard area: you don’t “try it and see.” You assess, you plan, and you pick the lowest-risk option that still accomplishes the mission.
In the backcountry, the mission is getting everyone home. That means you’re balancing three things at once:
- Consequence: what happens if you slip
- Probability: how likely you are to slip
- Recovery: how easy it is to self-rescue
Swiftwater spikes consequence and crushes recovery, especially in cold water.
Current, depth, and cold are multiplicative hazards
A knee-deep creek can be trivial at 0.5 mph and deadly at 5 mph. Depth matters, but speed is what takes your feet out from under you. Add cold water, and your coordination drops right when you need it most.
A simple field rule: if you can’t easily stand still without bracing, you’re already behind the power curve. If you’re crossing in early-season snowmelt, plan like a professional and assume stronger current, numb feet, and slower decision-making.
For real-time context, check stream gauges when they’re available. The USGS National Water Information System is one of the most reliable sources for river stage and discharge data, and it can help you avoid showing up to a “normal crossing” on a surge day.
Hard red flags that should stop you
Some hazards don’t get negotiated with technique. If any of these are present, your safest move is usually to find another crossing, wait, or turn around:
- Strainers (downed trees/branches in current) anywhere downstream of your line
- A steep gradient leading into drops, ledges, or rapids
- Turbid, silty water where you can’t see footing and can’t read features
- Chest-deep water on anyone in the group, especially with a pack
- A long, slow pool with a hard current feeding into it (looks calm, but it’s a conveyor belt)
The National Weather Service guidance on moving water and floods is blunt for a reason. It’s worth reviewing their safety messaging before trips that involve high water: NWS flood safety information.
Safer alternatives that still keep you moving
A disciplined team doesn’t lock onto one solution. If the crossing looks marginal, you still have options that keep you progressing without gambling on a bad ford:
- Go upstream or downstream to find a wider, shallower section
- Cross earlier in the day if glacial melt peaks in the afternoon, or later if rain bands pass
- Use a bridge/log only if the approach and fall consequences are acceptable
- Re-route using solid navigation rather than trail dependence
If you need to plot a detour with confidence, revisit the fundamentals in map-and-compass navigation in real terrain. A clean reroute beats a sketchy ford every time.
With the go/no-go decision made, the next step is picking a site that gives you every advantage.
Recon and selecting a crossing site that gives you an advantage
Once you’ve decided a ford is reasonable, you win or lose the crossing during recon. Your goal is to find a place where the river is predictable: slower, shallower, and readable, with clean entry and exit points.
In field terms, you want good “mobility corridors” on both banks. Don’t rush this. Ten minutes of scouting can save you from an hour-long emergency.
What a good crossing site looks like
Look for a stretch that is:
- Wide (flow spread out usually equals less depth and less speed)
- Straight (fewer hydraulic surprises than sharp bends)
- Uniform (consistent depth beats a trench-and-bar profile)
- Free of obstacles (no boulders that pin legs, no brush that grabs packs)
Avoid the outside of bends. Water piles up there and cuts deeper channels. The inside of bends often has a shallower gravel bar, but you still need to confirm the exit isn’t a mud wall.
Entry and exit are part of the crossing, not afterthoughts
People fixate on midstream and then slip on the first step or get trapped on the far bank. You want a stable staging area where everyone can kit up, communicate, and step in deliberately.
On the exit side, you need a realistic plan for the last two steps, when the current is still pushing and you’re tempted to lunge. A steep, vegetated bank can turn a successful ford into a fall.
If you can’t identify a safe exit, you don’t have a safe crossing.
Scout your “downstream consequences” like a professional
Before anyone enters the water, walk downstream and identify what happens if a person is swept. You’re checking for:
- Strainers and logjams
- Undercut banks
- Boulders that create pin zones
- Drop-offs and rapids
- Long swims in freezing water
A useful discipline is to pick a downstream “line of no return.” If a swimmer passes that point, your rescue options change dramatically.
That downstream look informs whether you set a downstream safety (spotter with throw bag) or simply choose a different site. Once you’ve selected the site, your next job is reading the water like it’s a map.
Reading current: surface clues, hidden hydraulics, and “where to step”
Rivers talk constantly; most people just haven’t learned the language. Reading current is about predicting where the push will be strongest, where it will slack, and what’s happening below the surface.
If you can read the surface correctly, your crossing line becomes a controlled movement instead of a gamble.
Fast water, slow water, and the seams you can use
Look for seams where fast current meets slower water. These are often your best “lanes” because they let you work along a boundary rather than fight the full force.
Key surface indicators include:
- V-shaped tongues pointing downstream often mark deeper, faster flow
- Smooth, glassy water can mean depth, but it can also be laminar flow over bedrock
- Choppy, broken surface suggests rocks close to the surface (footing hazards, but also friction that may slow water)
- Eddies behind rocks are rest zones, but their edges can be turbulent
Your objective is rarely “straight across.” More often, it’s a diagonal line that keeps you in slower lanes as long as possible.
Subsurface hazards that don’t announce themselves
Some hazards are visible only if you know what to look for:
- Holes and pour-overs: water drops over a rock ledge and circulates; even small ones can trap a leg
- Undercut rocks: the current disappears under the bank or boulder; avoid putting feet near the lip
- Silt over cobble: looks like a flat bottom but behaves like ball bearings
If the water is too opaque to read the bottom and you can’t probe safely, that uncertainty must be priced into your decision. In real operations, uncertainty is risk.
Estimating speed without instruments
You can get a rough current estimate with a simple float test. Toss a small stick into the main flow and time how long it takes to travel a measured distance (pace off 10-20 meters along the bank).
As a rough benchmark, 1 meter/second is about 2.2 mph. That’s already strong enough to knock many people off balance in knee-to-thigh depth.
You don’t need perfect math; you need an honest read.
Quick reference: If the stick moves “surprisingly fast” and you feel rushed watching it, treat that as a warning sign. Your legs will feel the same urgency midstream.
Now that you understand the river’s behavior, it’s time to make sure your gear and clothing won’t sabotage you.
Personal prep: footwear, pack management, and keeping your balance tools
Most river incidents happen because someone commits with sloppy kit. Before you step in, you want to remove snags, protect critical gear, and ensure your body can respond if you lose footing.
This is where discipline pays off. Small setup errors become big problems in moving water.
Pack and clothing setup that supports self-rescue
There’s a long debate about whether to unbuckle your hipbelt and sternum strap. The practical answer is conditional:
- If a swim is likely (strong current, deeper water), you want the ability to ditch the pack fast. That argues for loosening or unbuckling.
- If a swim is unlikely and footing is the main challenge, a snug pack can improve stability.
A middle ground many experienced travelers use: keep the hipbelt buckled but loose enough to rip free, and keep the sternum strap unbuckled. Whatever you choose, rehearse the motion so you can do it under stress.
Waterproof anything that can’t get wet. A trash compactor bag inside the pack is still one of the most reliable field solutions.
Footwear and foot care: traction now, damage control later
Crossing barefoot is rarely smart. You need sole protection, you need traction, and you need to avoid cutting your feet on sharp rock.
Trail runners can work if they drain well and you accept wet feet afterward. Boots can work if they’re stable and not acting like buckets.
Once you’re wet, your risk shifts to blisters, skin maceration, and cold injury. If you want a systematic approach to keeping your feet functional after repeated wet crossings, use the drills in foot care for long rucks and multi-day hikes. Good foot care is mobility insurance.
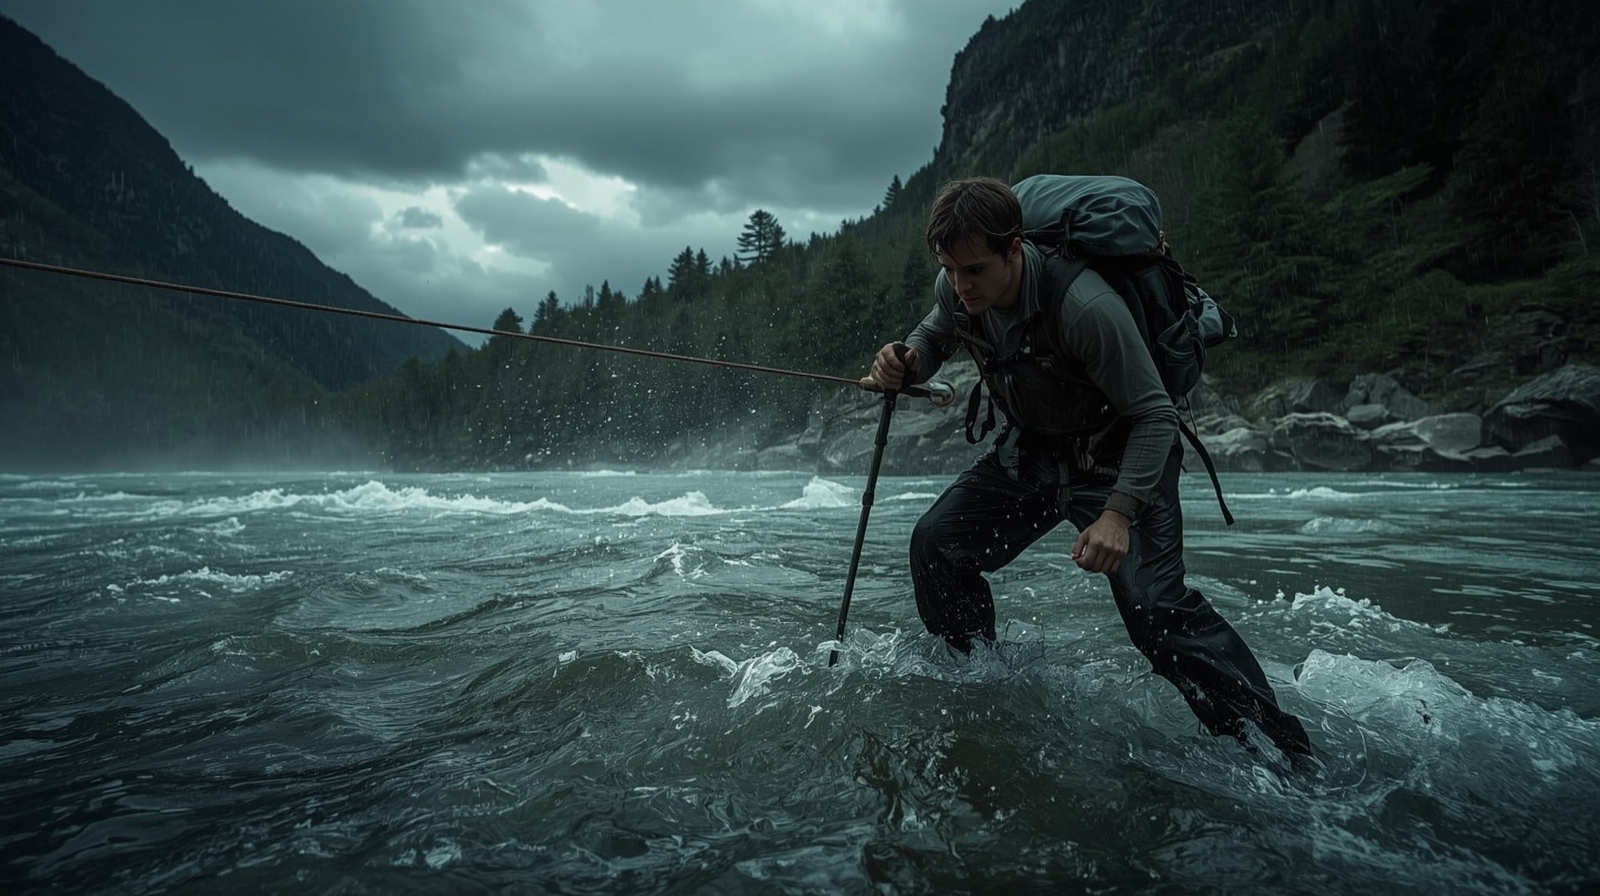
Trekking poles and improvised probes
A pole is not a hiking accessory during a ford; it’s a third and fourth point of contact. Two poles give you a stable “tripod” base as long as you plant them deliberately and don’t let them get swept.
If you want a deeper breakdown on bracing and planting angles, study trekking pole techniques for steep and unstable ground. The mechanics translate directly to moving water.
If you don’t have poles, a stout stick can work. The key is length (roughly armpit to shoulder height) and strength (it won’t snap when loaded).
With your kit squared away, you can focus on the one thing that matters most midstream: staying on your feet.
Footing strategy: body mechanics that keep you upright in pushy water
Swiftwater fording is a stability problem. The current pushes at your legs while the riverbed tries to roll your feet.
Your job is to manage your center of gravity, keep multiple contact points, and move with deliberate micro-steps rather than big commitments.
The “shuffle step” and why it works
The most reliable technique for uneven bottoms is the shuffle:
- Keep at least one foot planted at all times
- Slide the leading foot forward without lifting it high
- Probe for stable purchase before transferring weight
Lifting your foot high lets the current catch your shin and creates a lever that rotates you. Sliding keeps your profile low and helps you “feel” holes and loose rocks.
Don’t step on top of round rocks if you can avoid it. Step between them or on the upstream side where friction is better.
Angle your body to reduce the force you fight
If you face directly upstream, you’re taking the full push on your thighs. If you face directly downstream, you can’t see footing and you’re one slip away from a fall.
A practical compromise is a slight upstream angle: shoulders turned 30-45 degrees into the current while you move diagonally. This reduces the force vector while keeping your vision and poles working.
Keep knees slightly bent and hips low. A stiff-legged stance is a breakable stance.
Use micro-rests and eddies like staging points
Even a short ford can spike fatigue. If there are safe micro-eddies behind rocks, you can use them as rest points-but only if entering and exiting the eddy doesn’t expose you to turbulence or a foot-trap.
A disciplined approach is to plan “checkpoints” during your line selection. If you’re halfway across and realize you can’t stop without wobbling, you misread the water or overestimated your ability.
That’s a lesson to apply before the next crossing. Next, you’ll need to apply these mechanics to the added constraints of crossing alone.
Solo fording methods: controlled movement and a realistic swim plan
Sometimes you’re alone, or the terrain forces single-person movement. Solo crossings demand conservative choices because you don’t have human redundancy.
That means you want simpler lines, stronger margins, and a plan for what happens if you lose your feet. Don’t rely on optimism. Build a process you can execute under stress.